Have you ever wanted to build a Gaming PC? And not sure how to make your first gaming PC?
I know its pain in the ass to select the compatible PC parts and build your first PC on your own, and sometimes it’s a lot of time-consuming then you think to choose the compatible PC parts and find them online for building a gaming PC.
But you don’t have to worry now!
We at BuildMyPC, make it extremely easy to build your first gaming PC by setting up a virtual environment to test the compatibility of each and every parts simultaneously and make it easy for you to choose the compatible parts.
So if you never build a gaming PC, because you’ve never done one before or you’re afraid of messing up with the computer parts compatibility, then you’ve clicked on the right blog post.
In this guide, we’re going to share the full method through which you can easily make a list of compatible PC parts and build your first gaming PC quickly, and by the time you finish reading this post, you will know how to build a gaming PC.
The very first step in building a gaming PC is to select the list of compatible PC parts. Once you have got the list, you can purchase it from various online retailers like Amazon, BestBuy, B&HPhotoVideo, etc.
So the first question is…
How to Choose Compatible PC Parts
Choosing the list of compatible PC parts is one of the essential things you need to do when you’re building a PC for yourself. Most of the time, when I see people, they stuck at the compatibility of these parts and messed up buying the wrong product.
And then they end up wasting or damaging those products, and later they pay around $40-100 on sites like Fiverr just for the list of compatible PC parts.
You won’t believe me, but this is an insanely huge price for the list of compatible PC parts, and you can even get an additional SSD storage disk for your gaming PC at the same cost.
So why waste your money on outsourcing compatible PC Parts, and why not build a list of compatible parts by yourself?
But how? How can you build a list of compatible parts without any knowledge about compatibility?
Don’t worry!
We’re here to help you, and we help you to build a list of complete PC parts that are even compatible with each other. And for this, we have created a free website Build My PC, that will help you to choose compatible PC parts easily.
We have an algorithm to virtually test each and every product listed on Amazon and provide you with a reliable and efficient parts list.
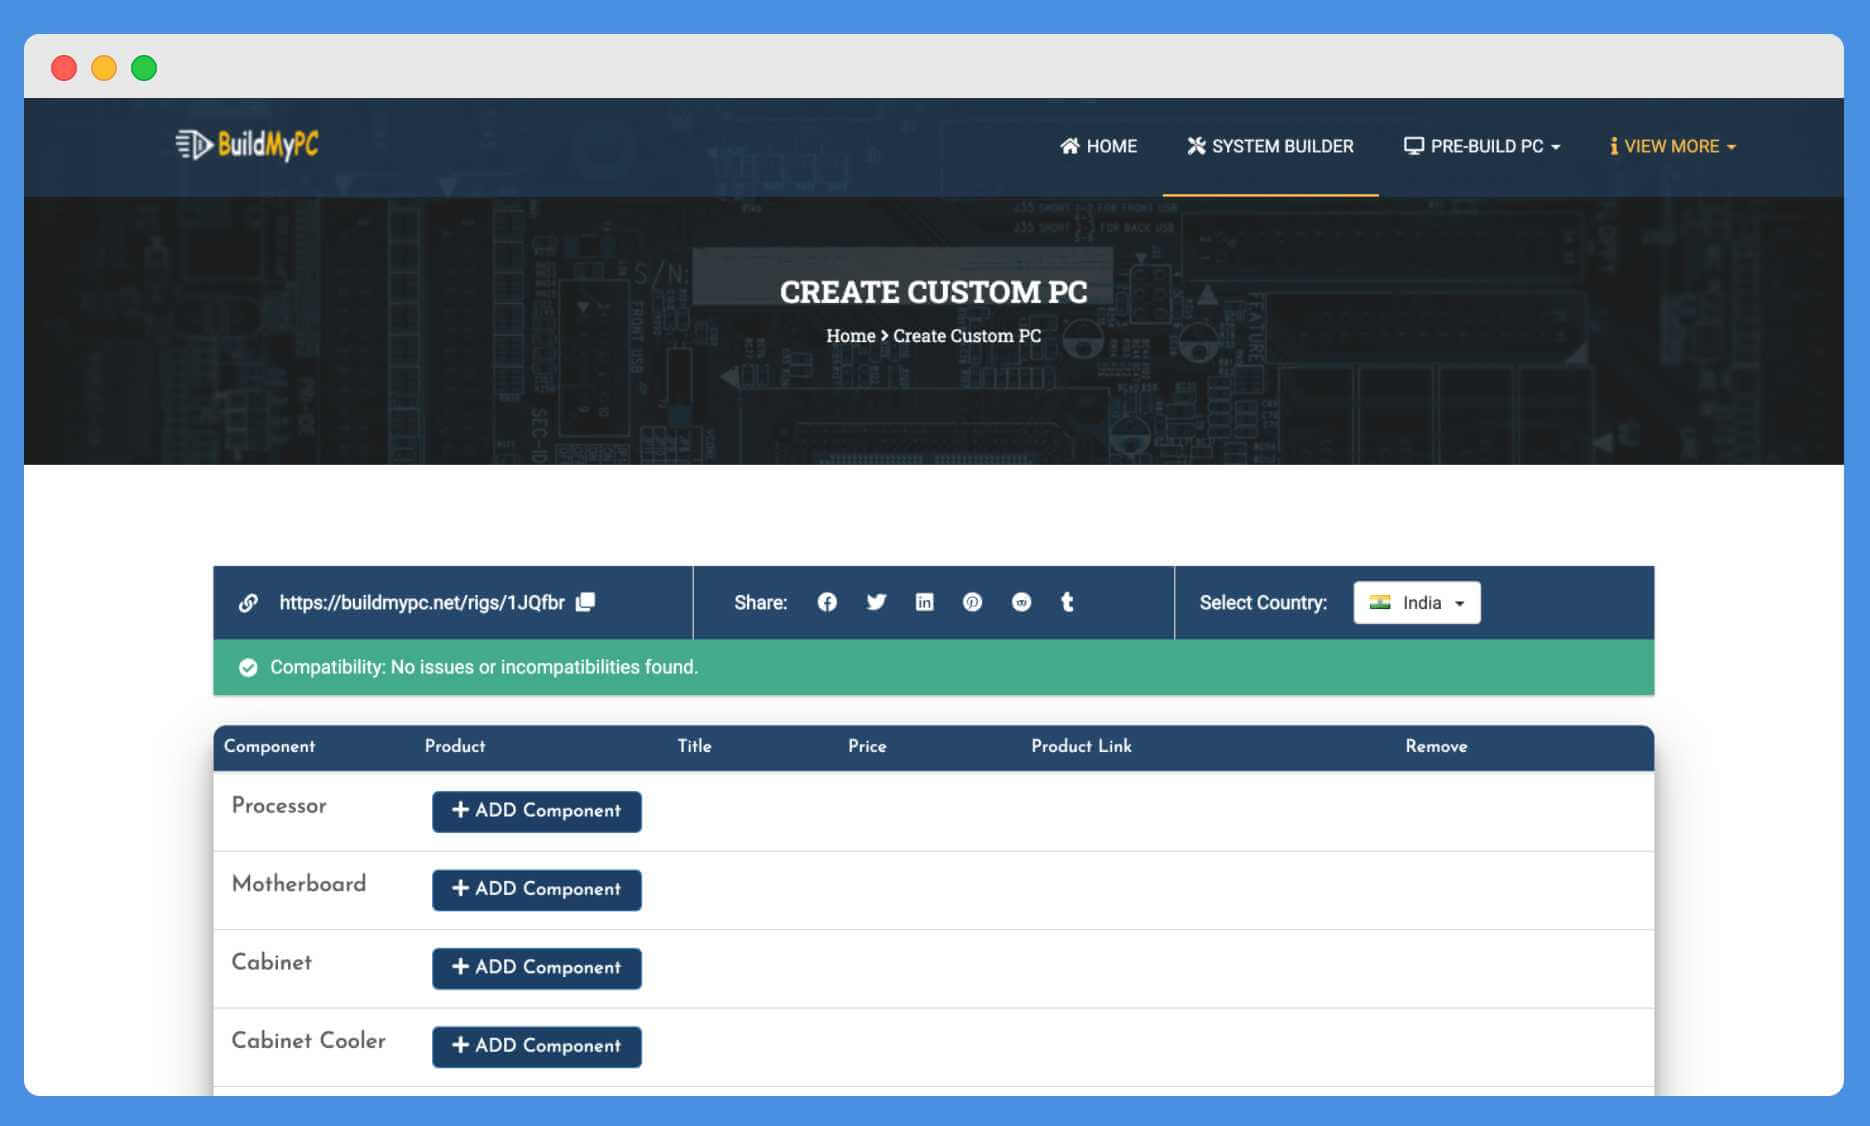
So once you’re sure with building a gaming PC for yourself, you can go to our System Builder page and choose the product according to your requirements to create a list of compatible parts for your gaming needs.
Once you’re on our System Builder page, you’re ready to set up your virtual environment and start building a list of compatible PC parts.
You’ll get various options on the System Builder page to build the list of compatible PC parts.
Here I’m explaining few of them to you;
- Unique Rig Link: When you start building a PC and set up your virtual environment, then our automated system creates a unique rig link for you. You can later share the list of compatible parts with your friends using it.
- Change Country Option: Our system will automatically detect your location using your IP address and change your country accordingly. This feature is really helpful, and it only shows the compatible parts which are available in your country.
- Components: We have listed 20 different computer components which are essential for building a PC. You can click on the “Add Component” option and start choosing the compatible components according to your needs. It only shows parts that are compatible with each other.
Now we’re aware of the System Builder page, and we can start building a PC by testing the compatibility of the product.
As you can see in our system builder, that we’ve listed the processor on the top of the component section. So we start by selecting the processor and then the motherboard.
Processor
The first thing we start by choosing is a processor. The processor is one of the most essential parts of a computer, and once we select the best processor as per our budget and need and then we’re up for choosing other computer parts.
So click on the “Add Component” button next to the processor option. It will open another page where you can get a list of all AMD & Intel processors.
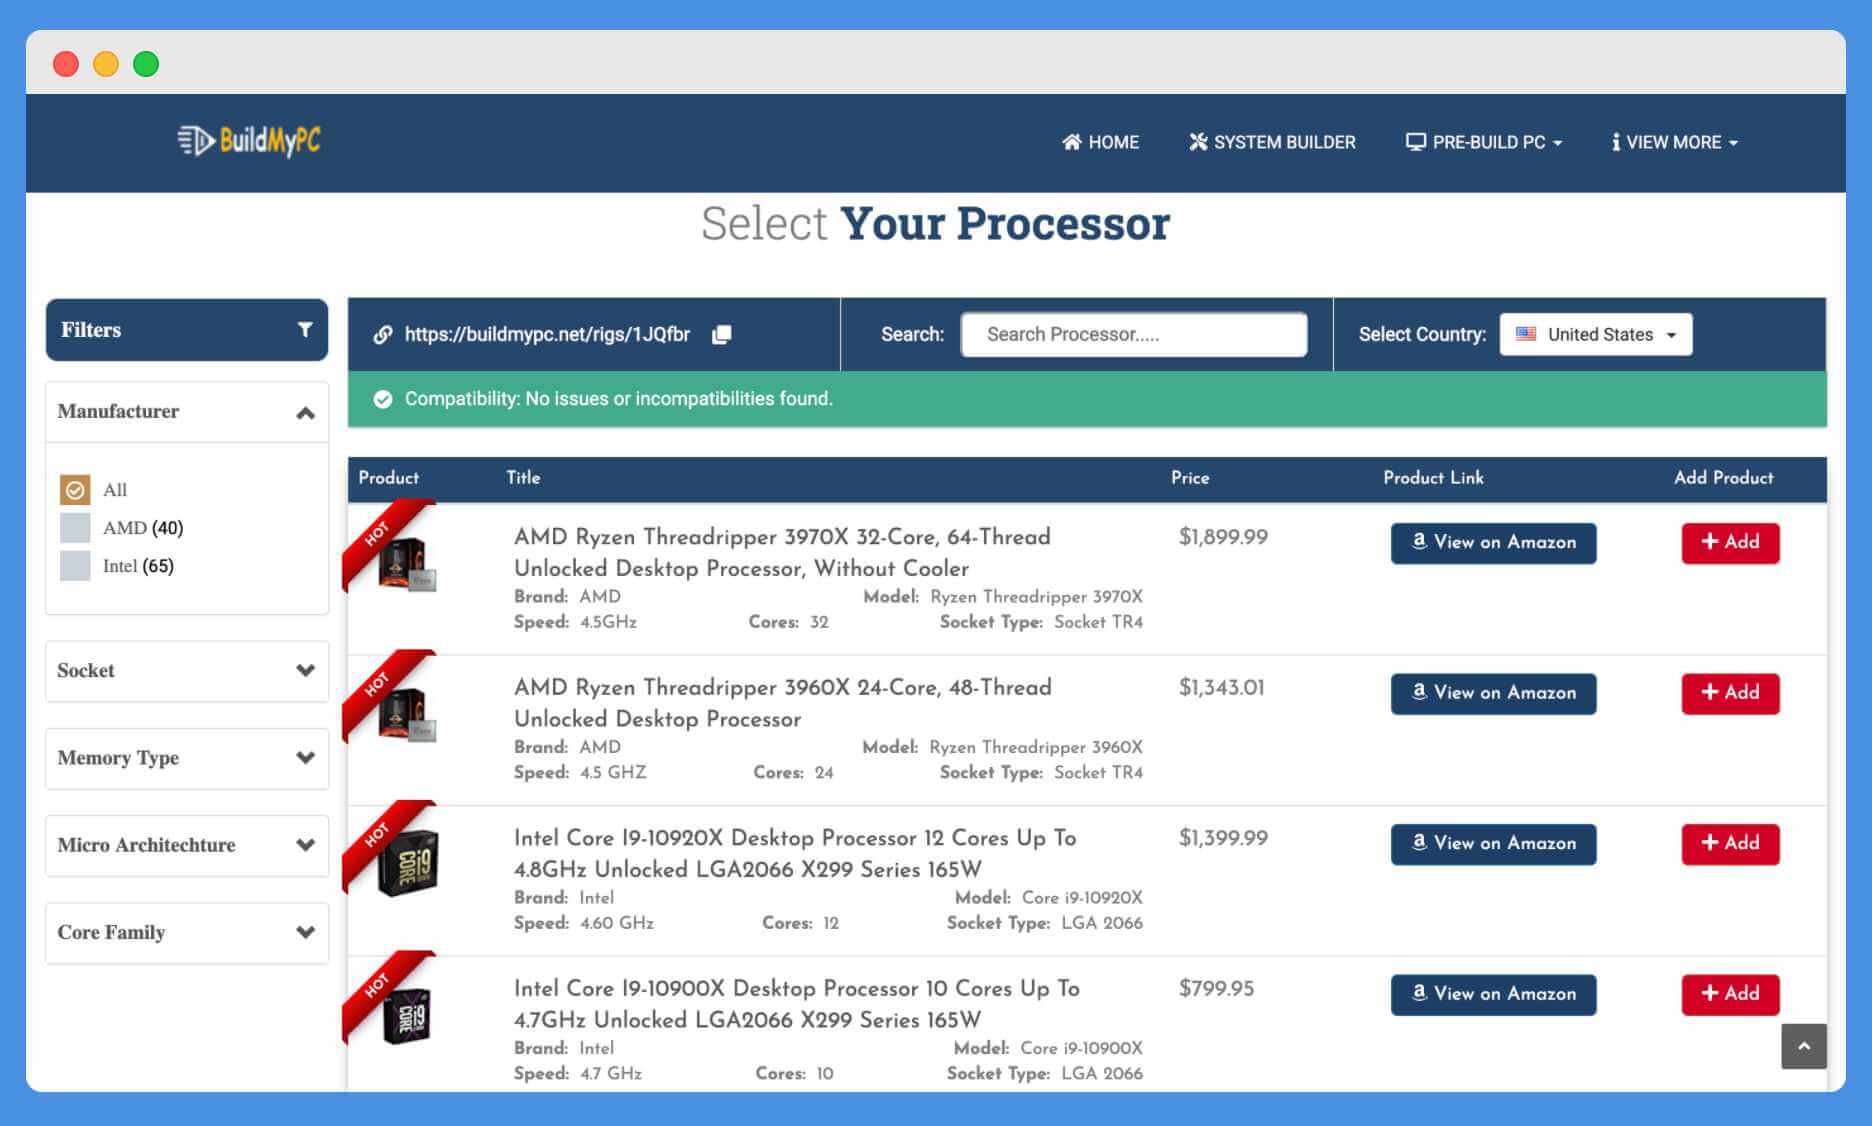
You’ll get the list of various processors to choose from. Also, on the left sidebar, you’ll get few filters that help you to sort the list of processors according to your needs.
Here are the options you get on the processor page;
- Search Bar: You’ll get an option to search for the product using our advanced cloud-based search option. You can easily search for products by using a brand name, model number, socket type, etc., options.
- Filters: Apart from the search bar, you’ll get an option to filter the product using various factors. It can include grouping and filtering them by brand name, core family, socket type, etc.
- View on Amazon: With every product, we share an Amazon link through which you can quickly check the processor and its reviews on Amazon within a single click. So no more hiccups of finding the compatible product.
Now choose the processor according to your budget and performance from the list, and once you’ve selected the processor, click on the “Add” button, and it will add the product to your system builder list.
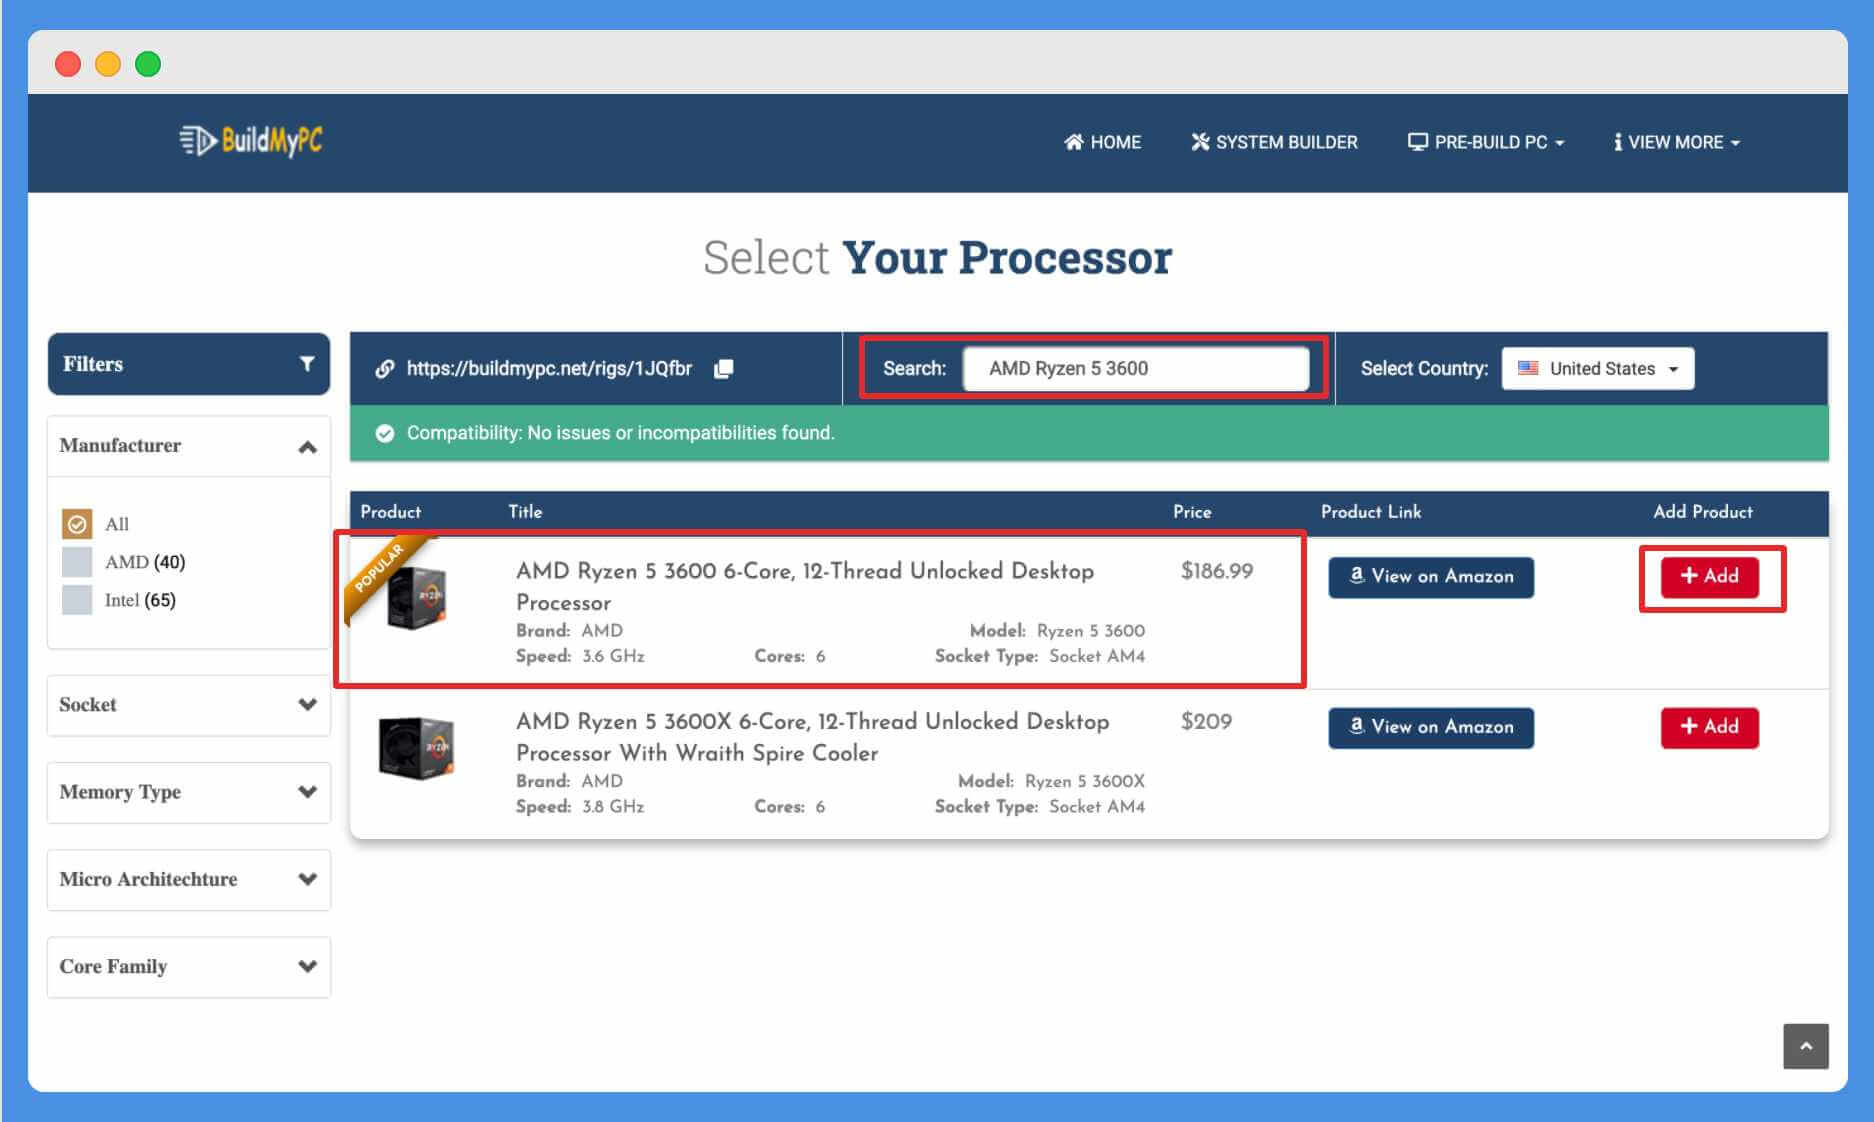
For example; Here in the screenshot above, I’m choosing the “AMD Ryzen 5 3600” processor for my build. The processor comes with a 6-core and 12 threads option, and you can even unlock this processor for optimum performance.
Now click on the red-colored “Add” button to add this product in your System Builder list.
Bingo! You’ve successfully selected the processor for your PC build. Now you’ve to choose a compatible Motherboard for your gaming PC.
Motherboard
Once you’ve selected the AMD processor for your build, now you’ve to choose the motherboard according to it.
So in the processor section, we’ve chosen the “AMD Ryzen 5 3600” processor, which has an AM4 socket type. So when selecting the compatible motherboard, make sure to choose AM4 based motherboard socket.
As you’re using BuildMyPC to build your first gaming PC, so you don’t have to worry about this, once you select the AM4 socket based CPU, we only show you the motherboard which are compatible with the AM4 device.
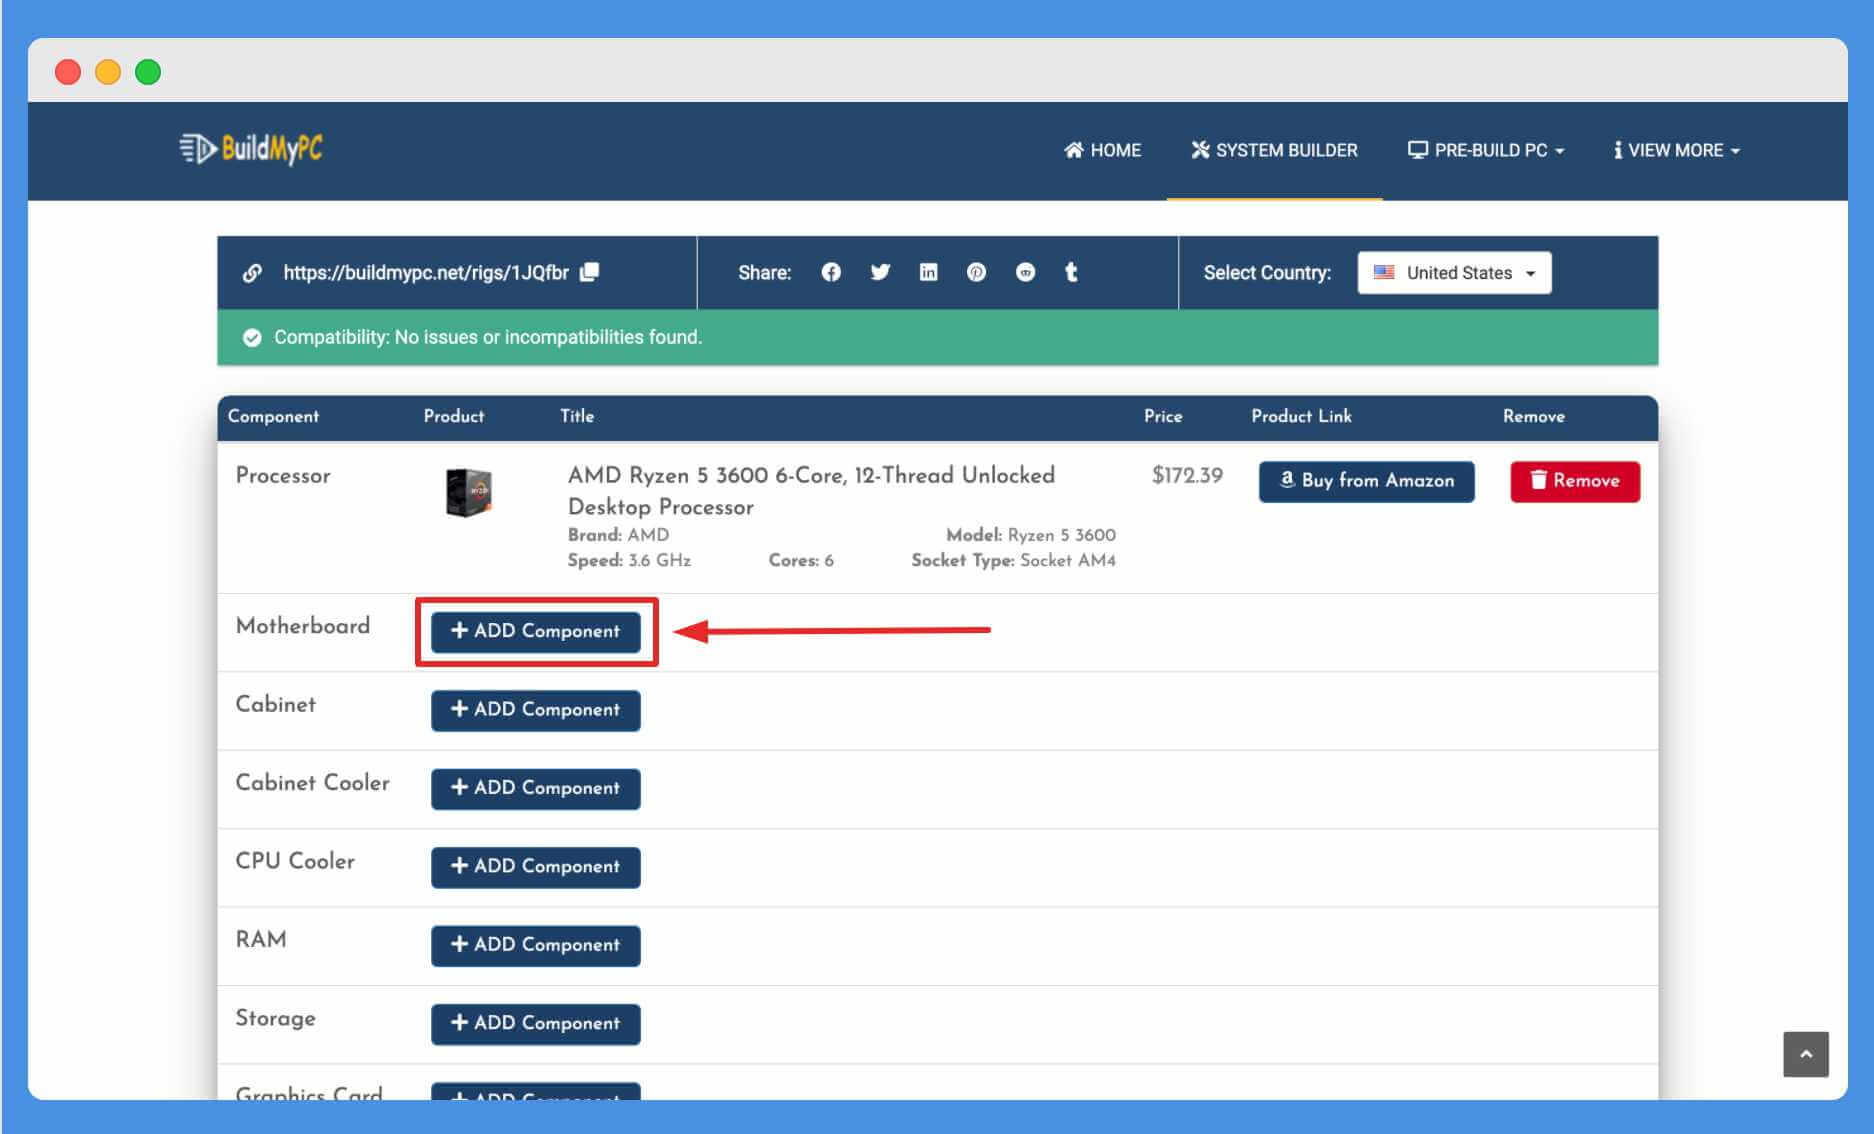
Now click on the “Add Component” button shown next to the Motherboard option.
Once you’re on the motherboard page, it starts showing some of the best motherboards that are compatible with the “AMD Ryzen 5 3600” processor. You can choose any of them.
We have also listed motherboard based on the most preferred options on our website. It can include;
- Popular Product: We have an algorithm implemented, which marks the products as “Popular” based on users’ preferences.
- Hot Product: We have another algorithm implemented, which shows the most viewed product in recent hours as a “Hot” product.
- Featured Product: It is a type of product that is officially recommended by our BuildMyPC team based on the most searched product in the market.
For better performance, we also recommend you choose a product from the “Featured“, “Popular“, and “Hot” section. As they are the most viewed products on our website and provides better performance.
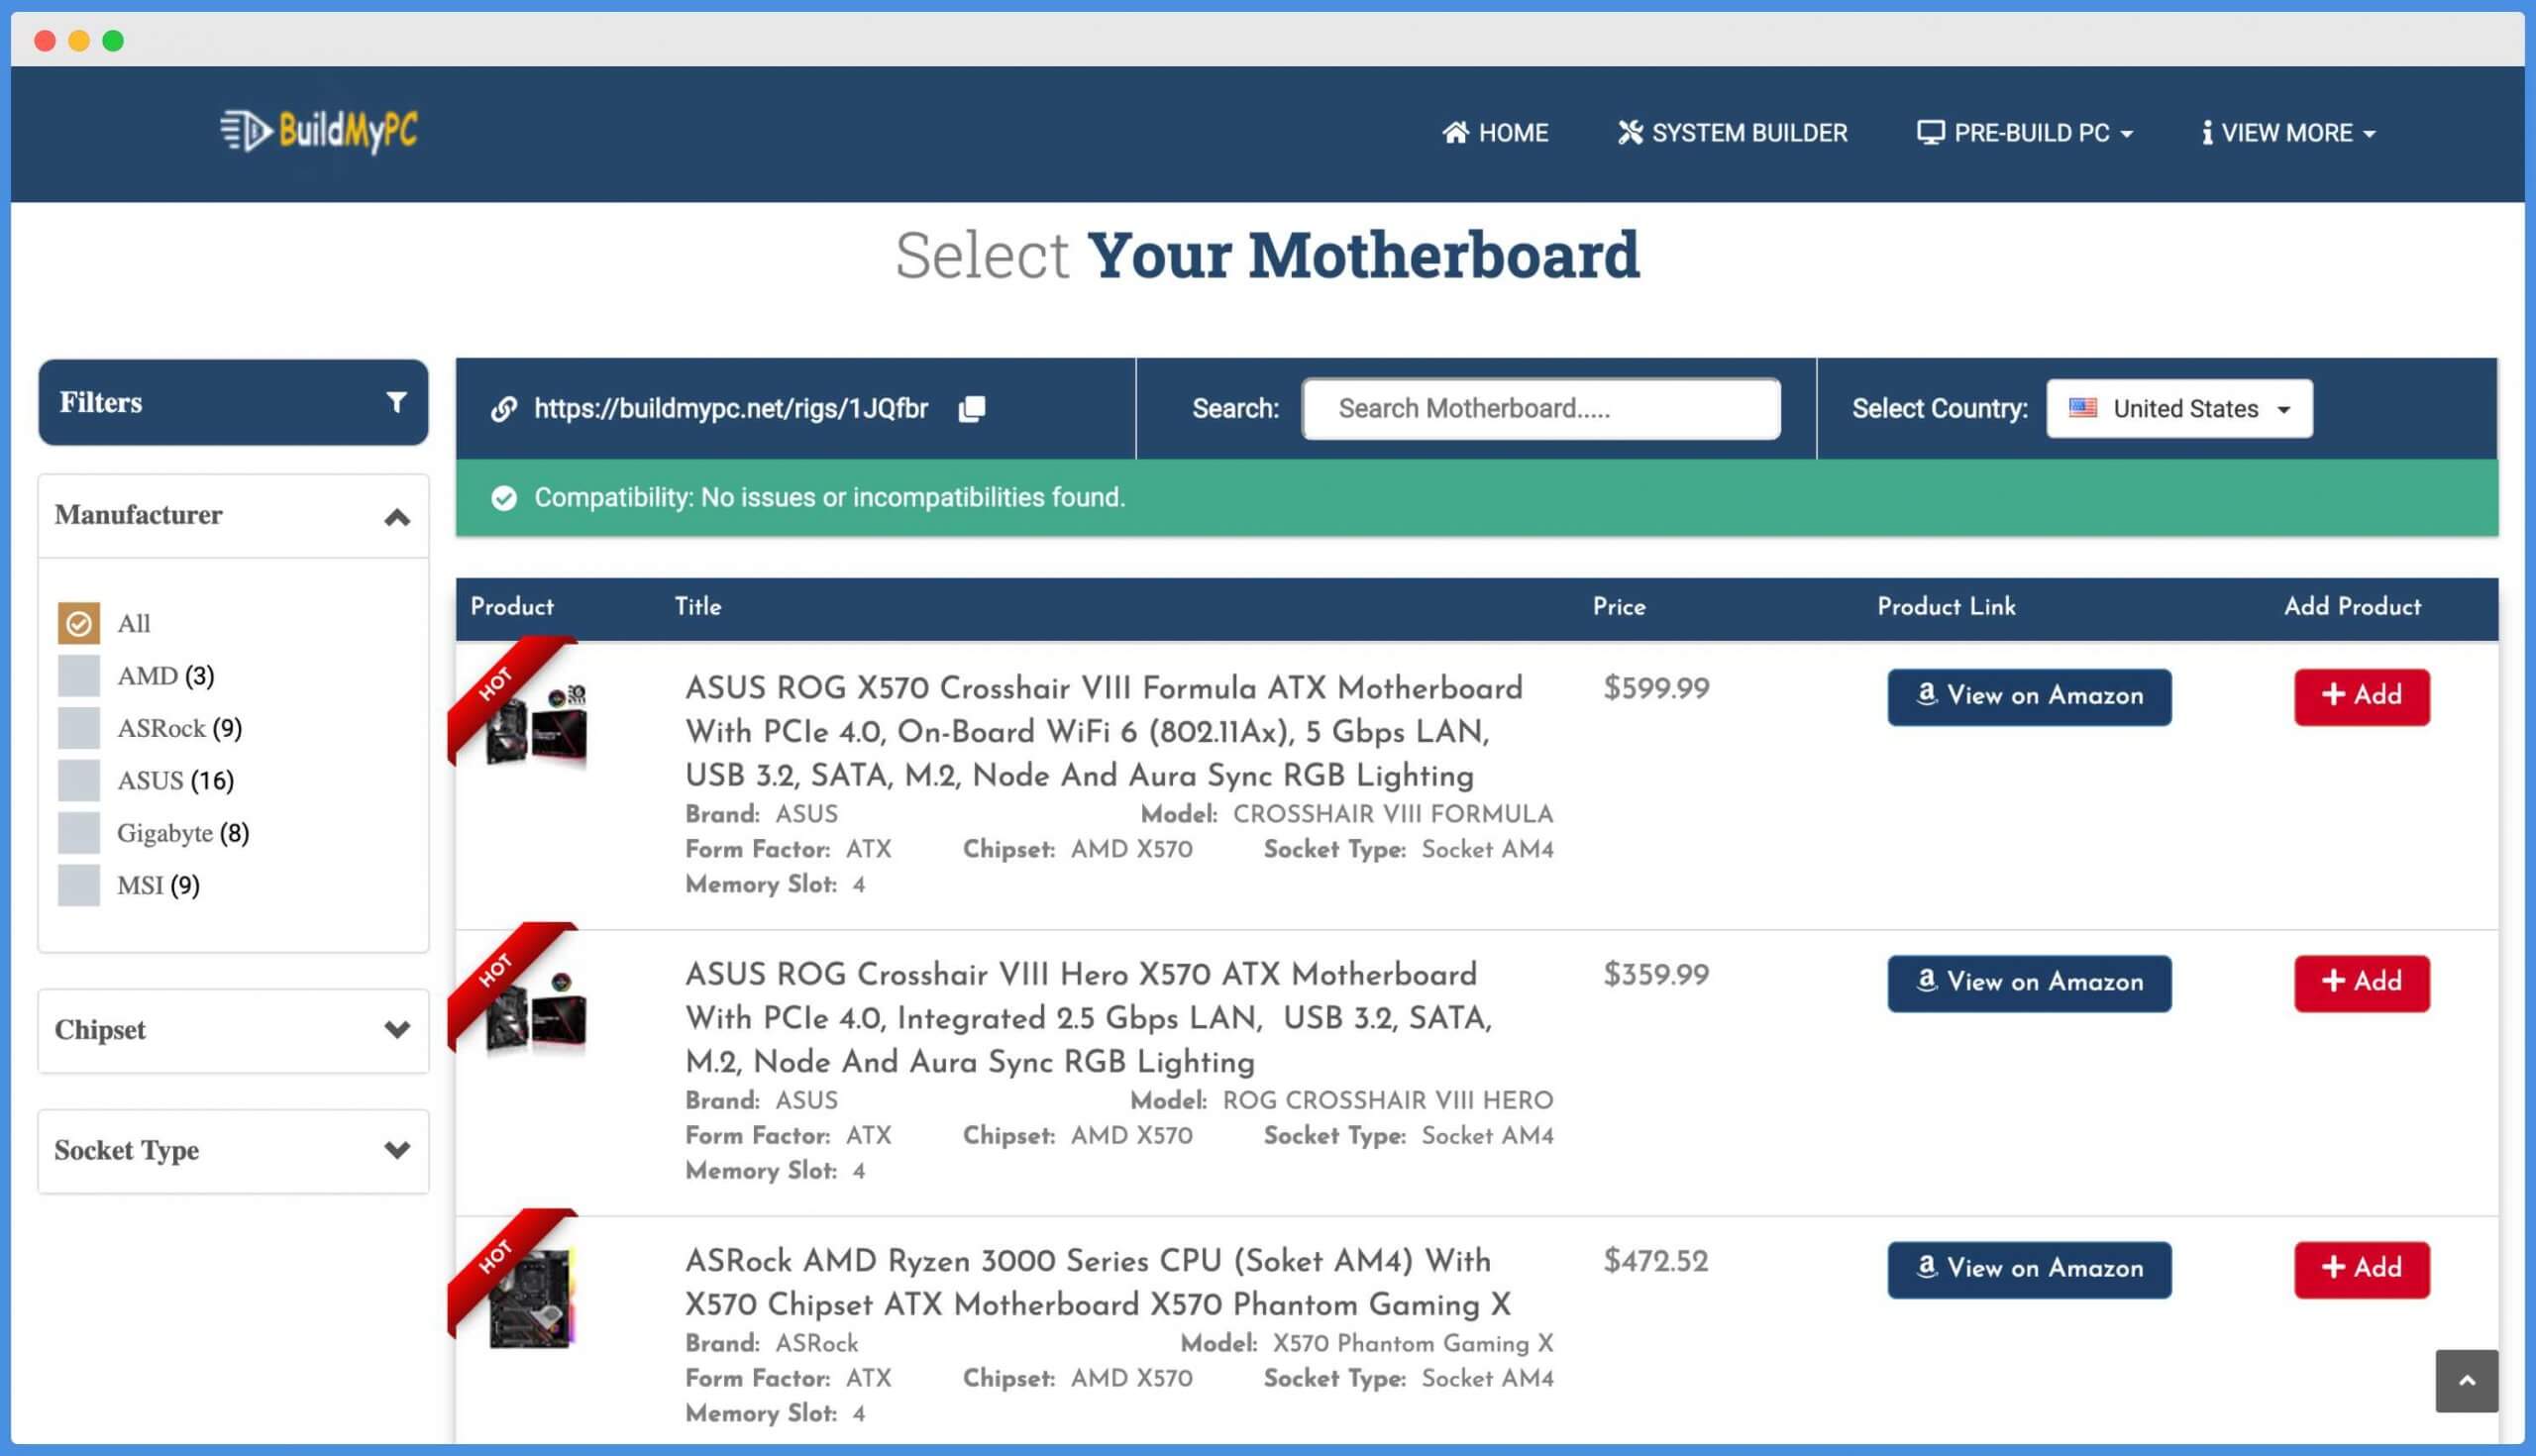
As I’m building a PC for gaming purposes, so I will only choose the most updated product for myself, and as you can see the motherboard based on X570 chipset is better than X470 chipset in many ways (click here to read X570 vs. X470 on Reddit) so I’ll choose it for building my gaming PC.
Here in the m motherboard section, I’m choosing the “ASUS ROG X570 Crosshair VIII Hero” motherboard.
The reason why I choose this product is because the “Asus ROG” series is well known for gaming, and this product only costs around $359.99 and is perfect for building a mid-range gaming PC.
Cabinet
We have successfully selected the motherboard and processor for our gaming computer build. Now, we will move towards choosing the cabinet case and other essential computer parts compatible with the motherboard.
In the above steps, we have added the “Asus ROG” motherboard in our compatible product list, which is an ATX based motherboard.
So we have to add a cabinet in which our motherboard can comfortably fit without any mess and have a space for power supply, graphics card, etc. to fit easily.
In this case, we have to choose a cabinet with Mid-Tower size, ATX, or Extended ATX. Click on the “Add Component” button next to the Cabinet component and select any of the cabinet cases of these sizes.
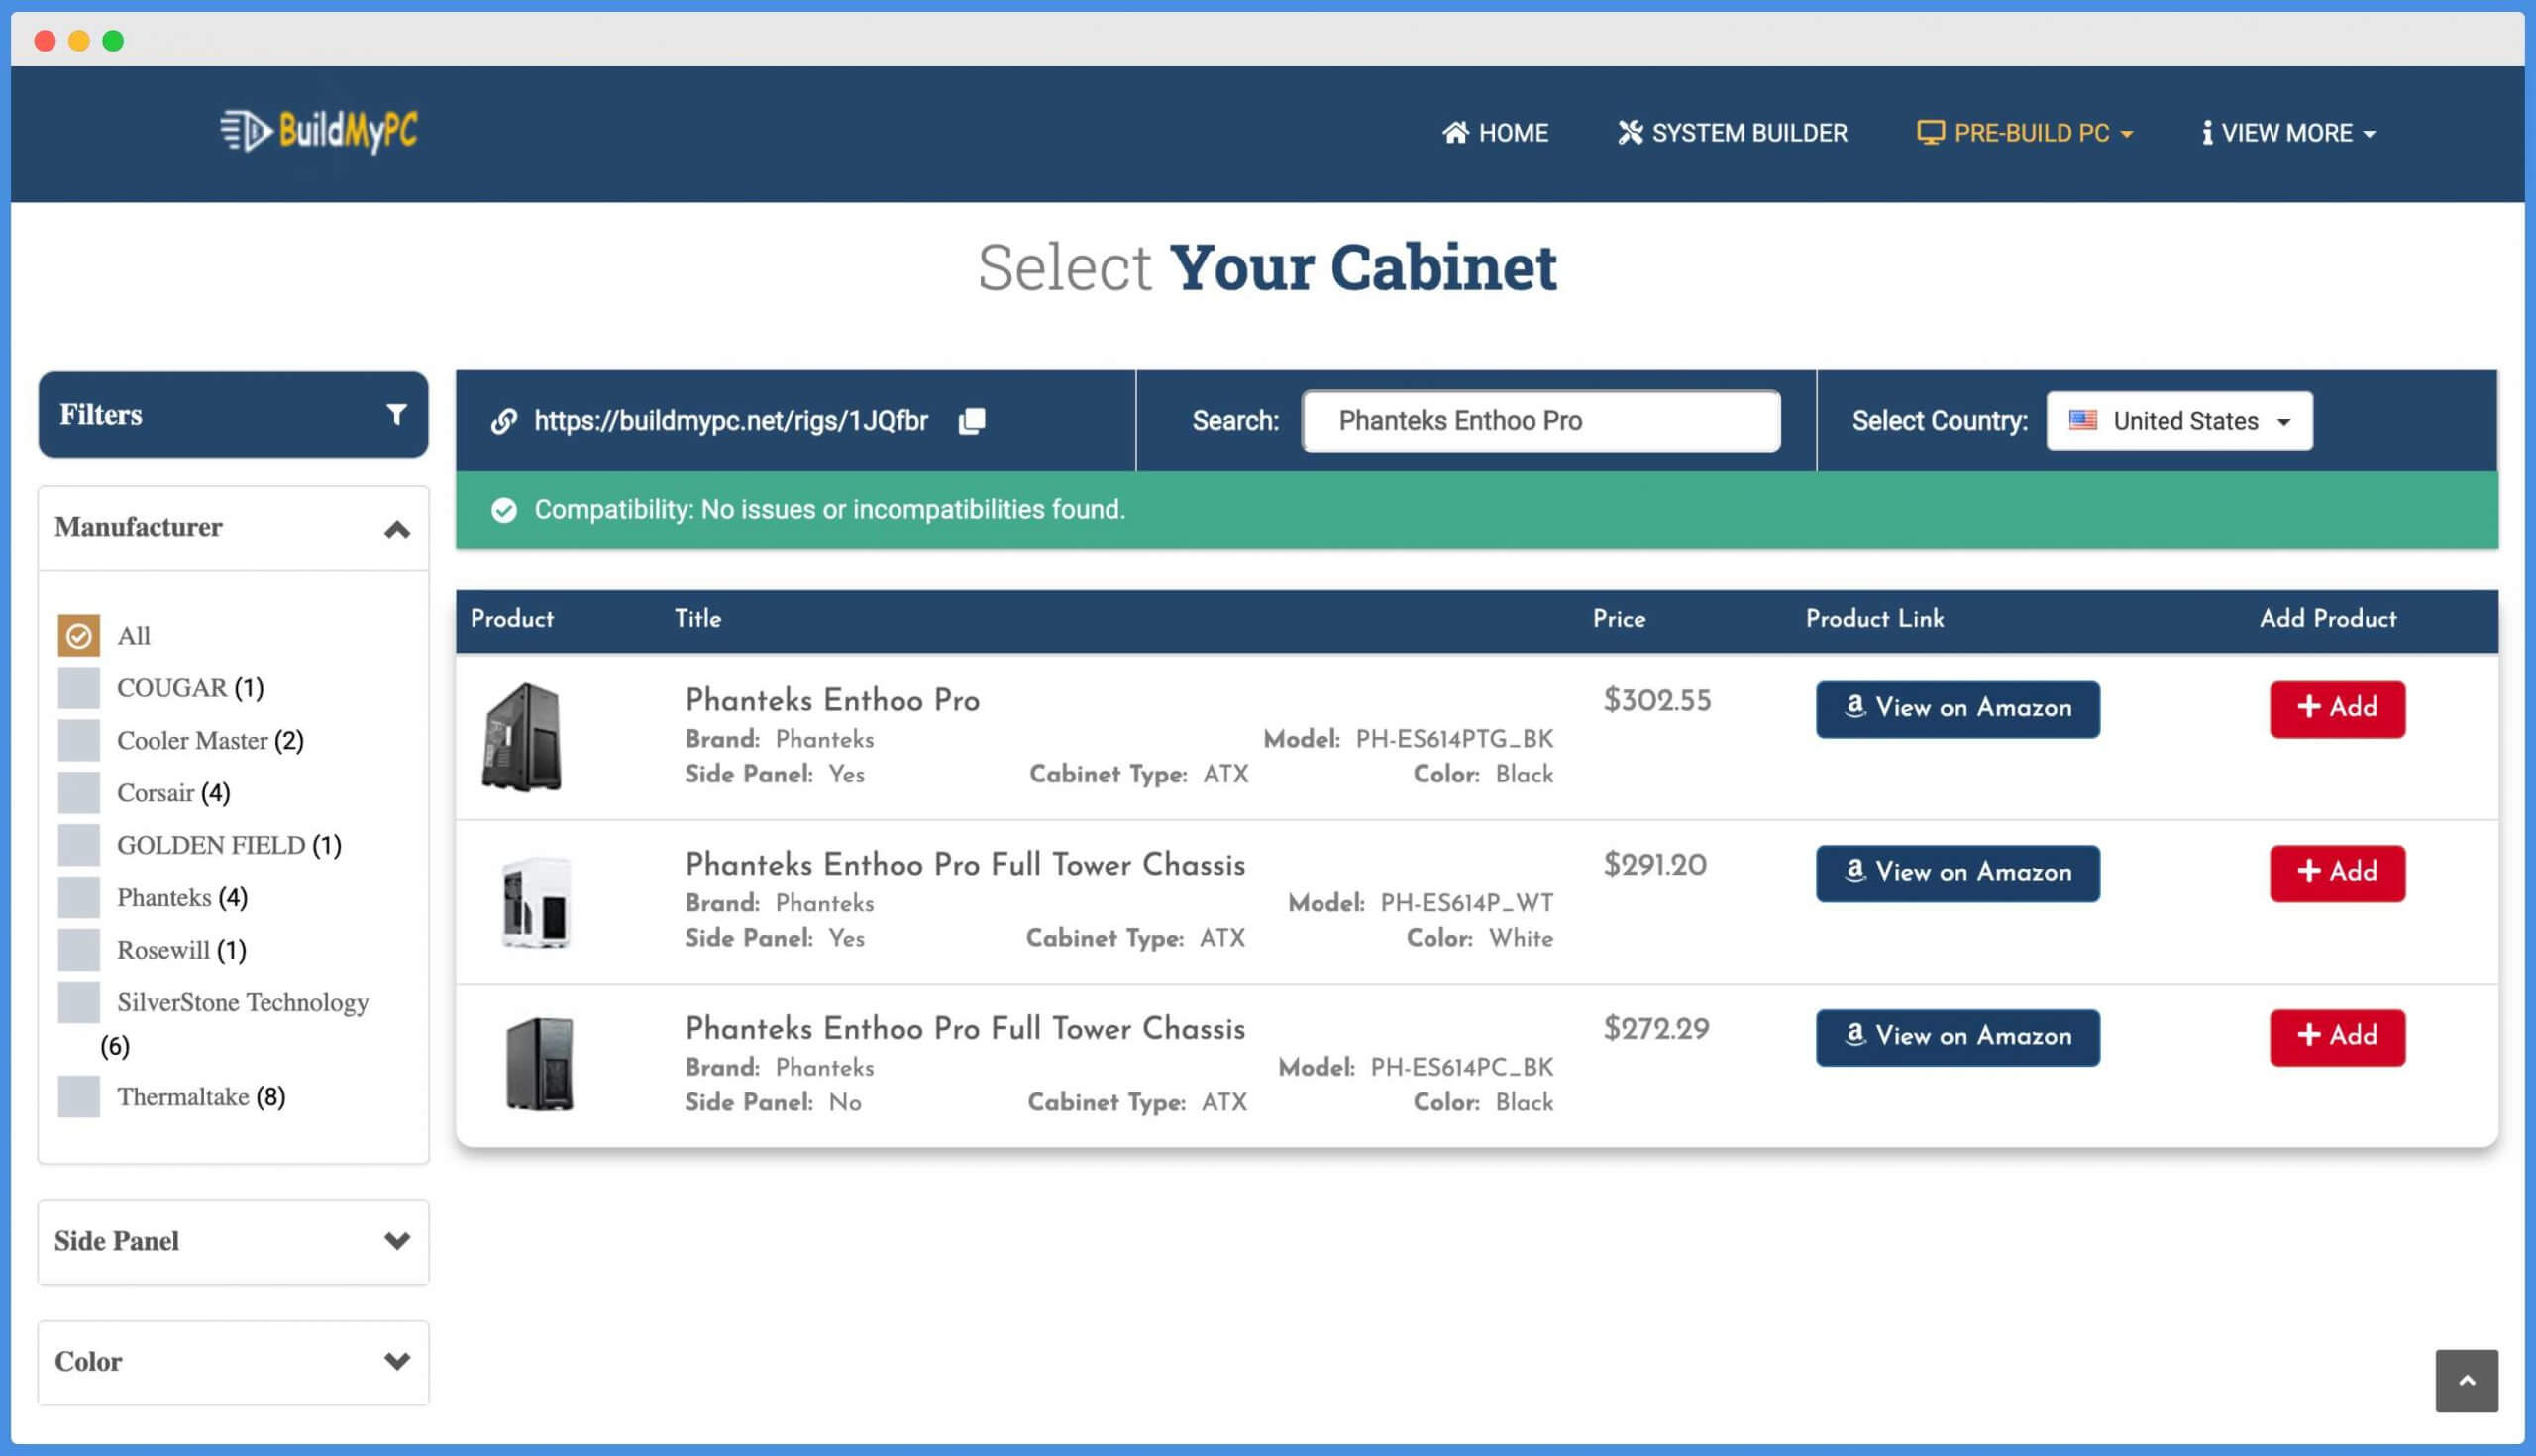
Now in the screenshot above, I’m searching for the “Phanteks Cabinet“. It’s your wish, and you can choose any cabinet from the list.
I chose the “Phanteks Enthoo Pro Full Tower” cabinet case because I love the whitish look of this case – but it totally depends upon you.
Once you’re done choosing the Cabinet case, we will move to the next part, which is selecting a cabinet cooler.
Cabinet Cooler
This is not necessary to add a cabinet cooler to our compatible parts because we always get stock cooler along with the cabinet case – but as we’re building a gaming PC, we need a powerful cabinet cooler, which prevents our system from massive heat.
So, in this case, we need a powerful cabinet cooler for our case.
Now click on the “Add Component” button next to the cabinet cooler option. It will redirect you to the cabinet cooler page from where you can easily add any compatible cabinet cooler for your cabinet case.
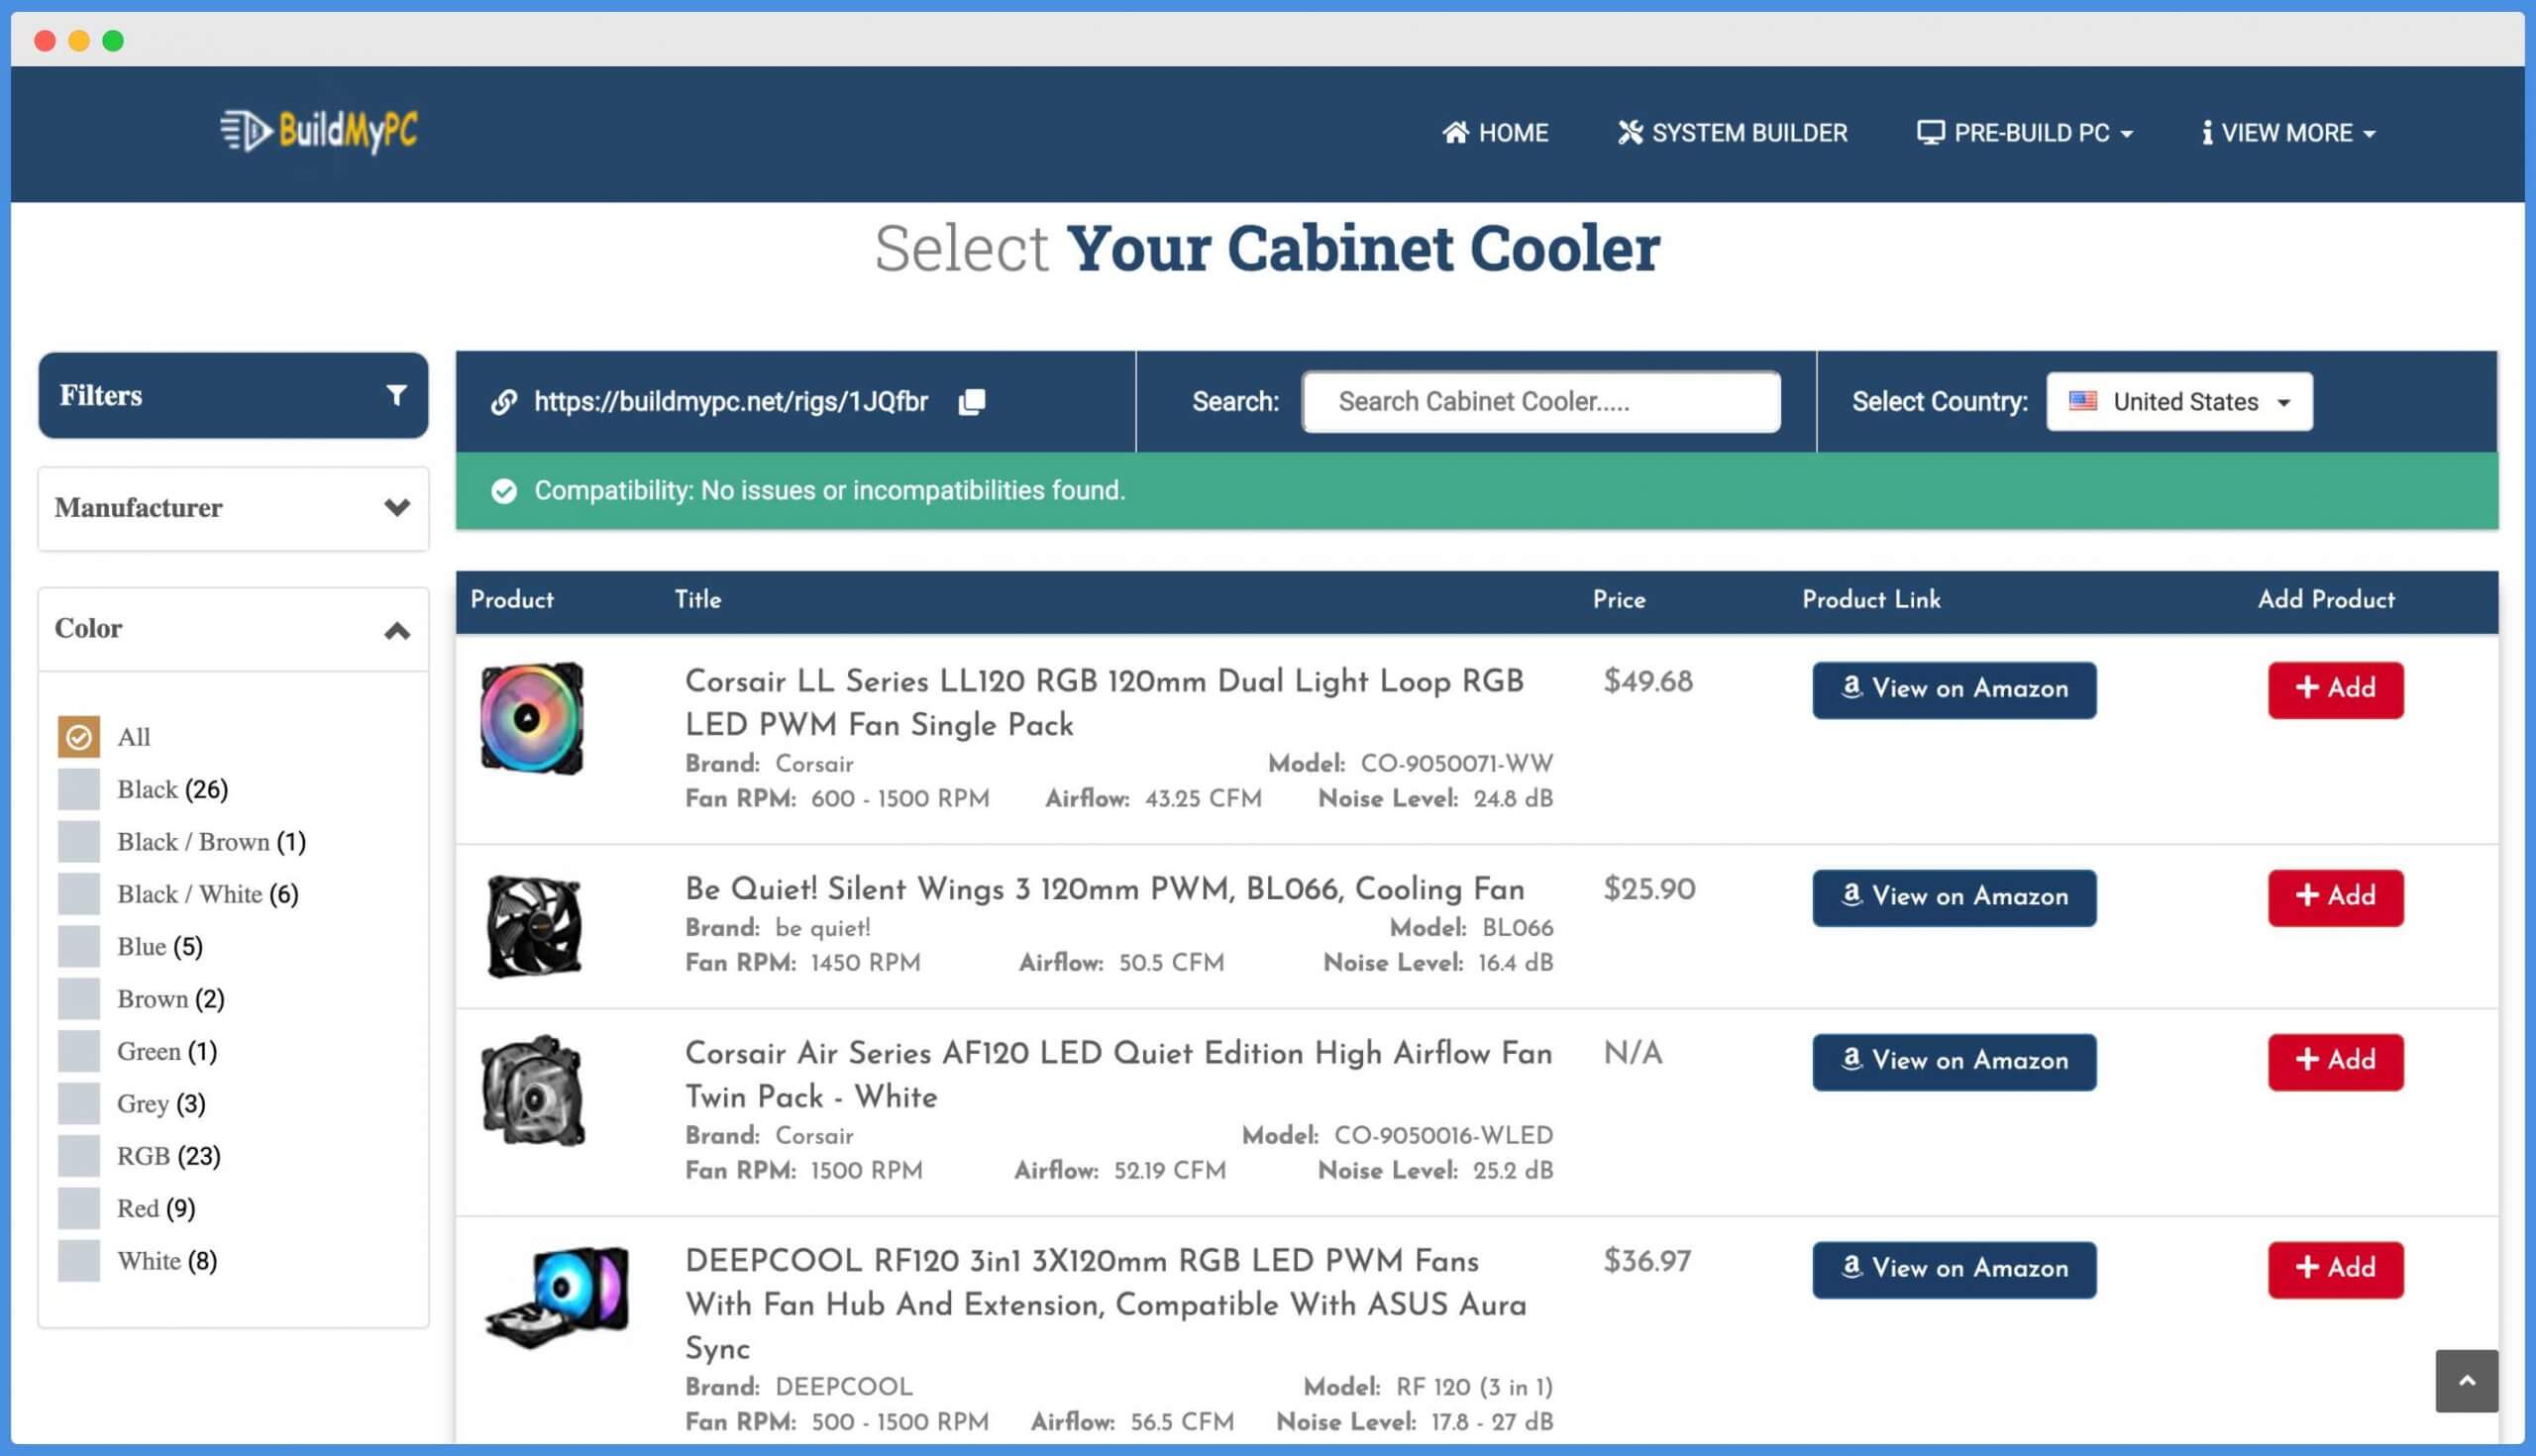
You’ll get various options like simple yet powerful cabinet cooler or an RGB based cabinet cooler. You can choose any of them according to your budget and requirements – but as we’re building a gaming PC, I want a cabinet cooler with an RGB option in it.
So, I’m choosing a “Corsair LL Series RGB Fan” for building my compatible PC parts. It is a single pack cabinet cooler, so we have to buy two fans for better usability (It’s totally your choice, you can even buy a single pack of this RGB fan because you’ll also get stock cooler along with the cabinet case).
CPU Cooler
Now we move towards the CPU cooler option. As similar to Cabinet Cooler, you’ll also get CPU cooler along with your processor, but sometimes when you buy an unlocked Processor, you’ve to purchase a CPU cooler separately.
But again, we’re building a gaming PC – So I’ll add an extra CPU cooler along with my compatible part list because I don’t want my system to get heat quickly.
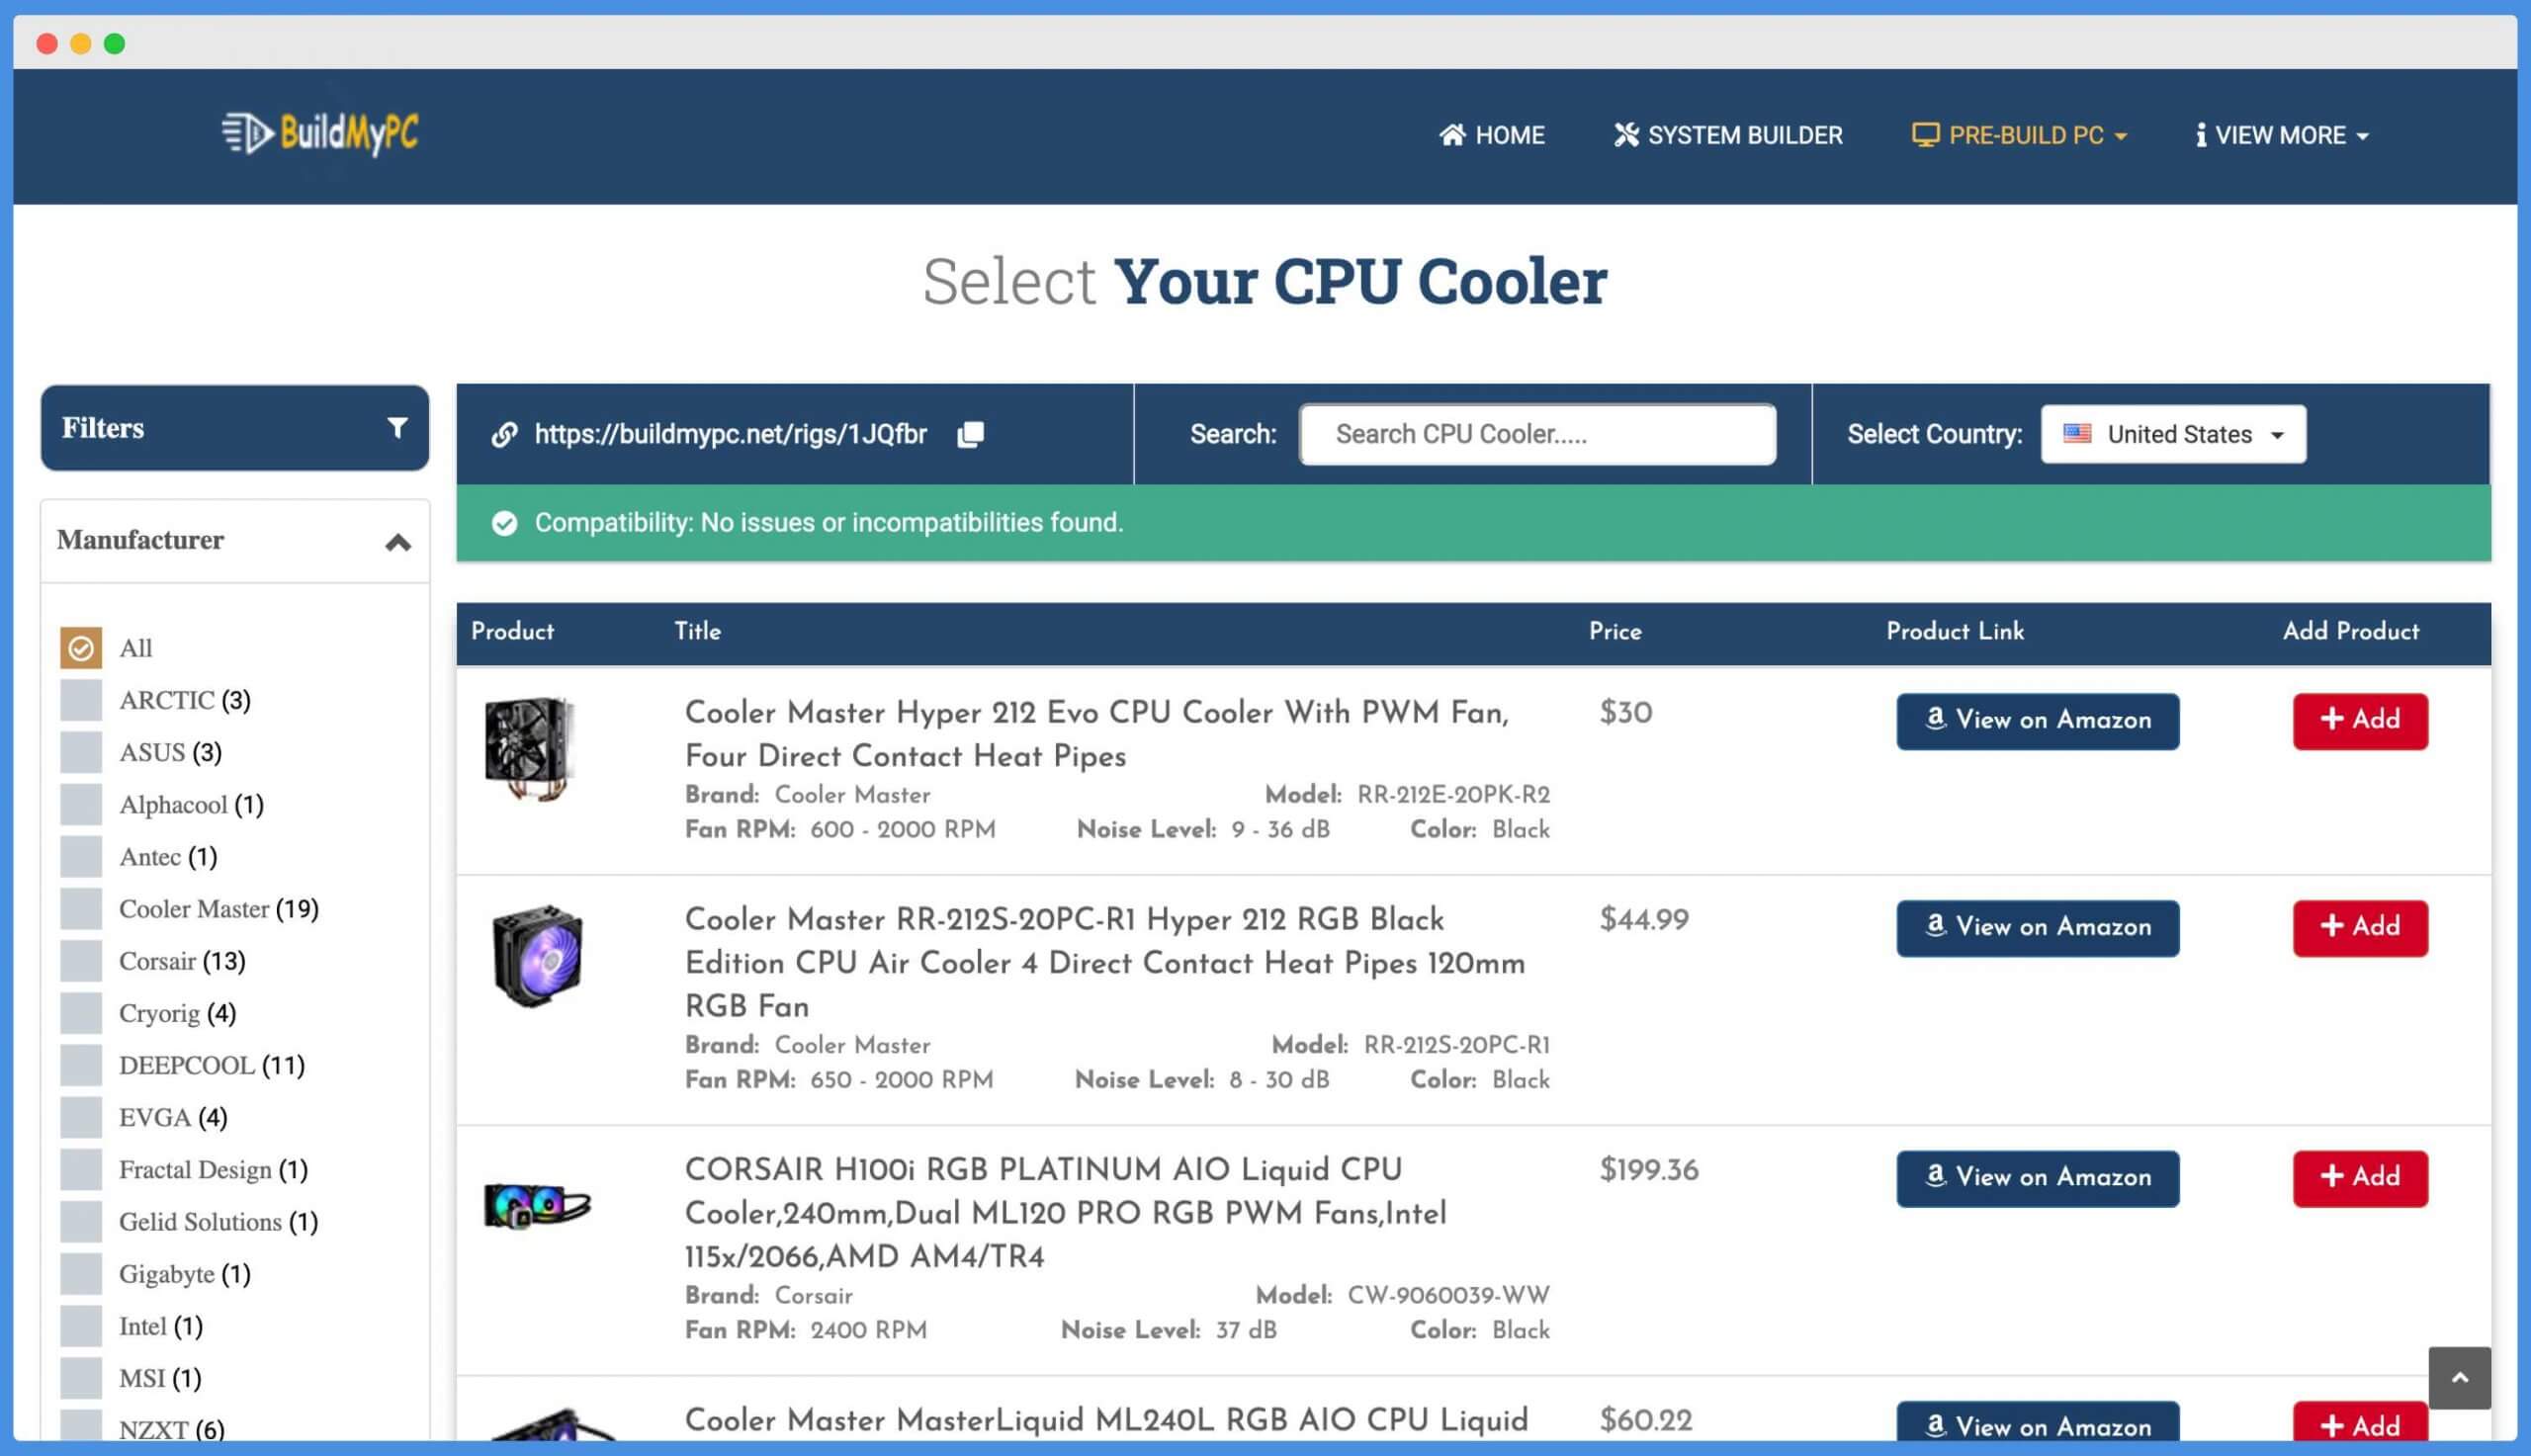
Now click on the “Add Component” button next to the CPU Cooler option to select a CPU Cooler for your processor.
Here I’m choosing a “Cooler Master Hyper 212 RGB” for cooling my processor. It supports AM4 based socket, have 8-30 dB noise level, and it is compatible with our cabinet case.
If you want, you can choose any other CPU cooler for building your gaming PC. Again what you choose is totally depends upon you and your requirements.
RAM
Now we move towards selecting one of the most essential parts of our computer build, and that is RAM. RAM stands for Random Access Memory, and it is one of the most important things for building your PC.
So we have to choose RAM carefully by checking various things and based on our needs.
For example; If you’re building a multipurpose PC build, then 8 GB – 16 GB RAM is sufficient for you, but if you’re building a high-end gaming PC, your system needs to have at least 16GB of RAM.
And if you’re limited in budget, I always recommend you to choose a mid-size cabinet for the lesser price and invest your money on adding more RAM to your device.
Now click on the “Add Component” button next to the RAM option to choose a compatible RAM for your virtual build.
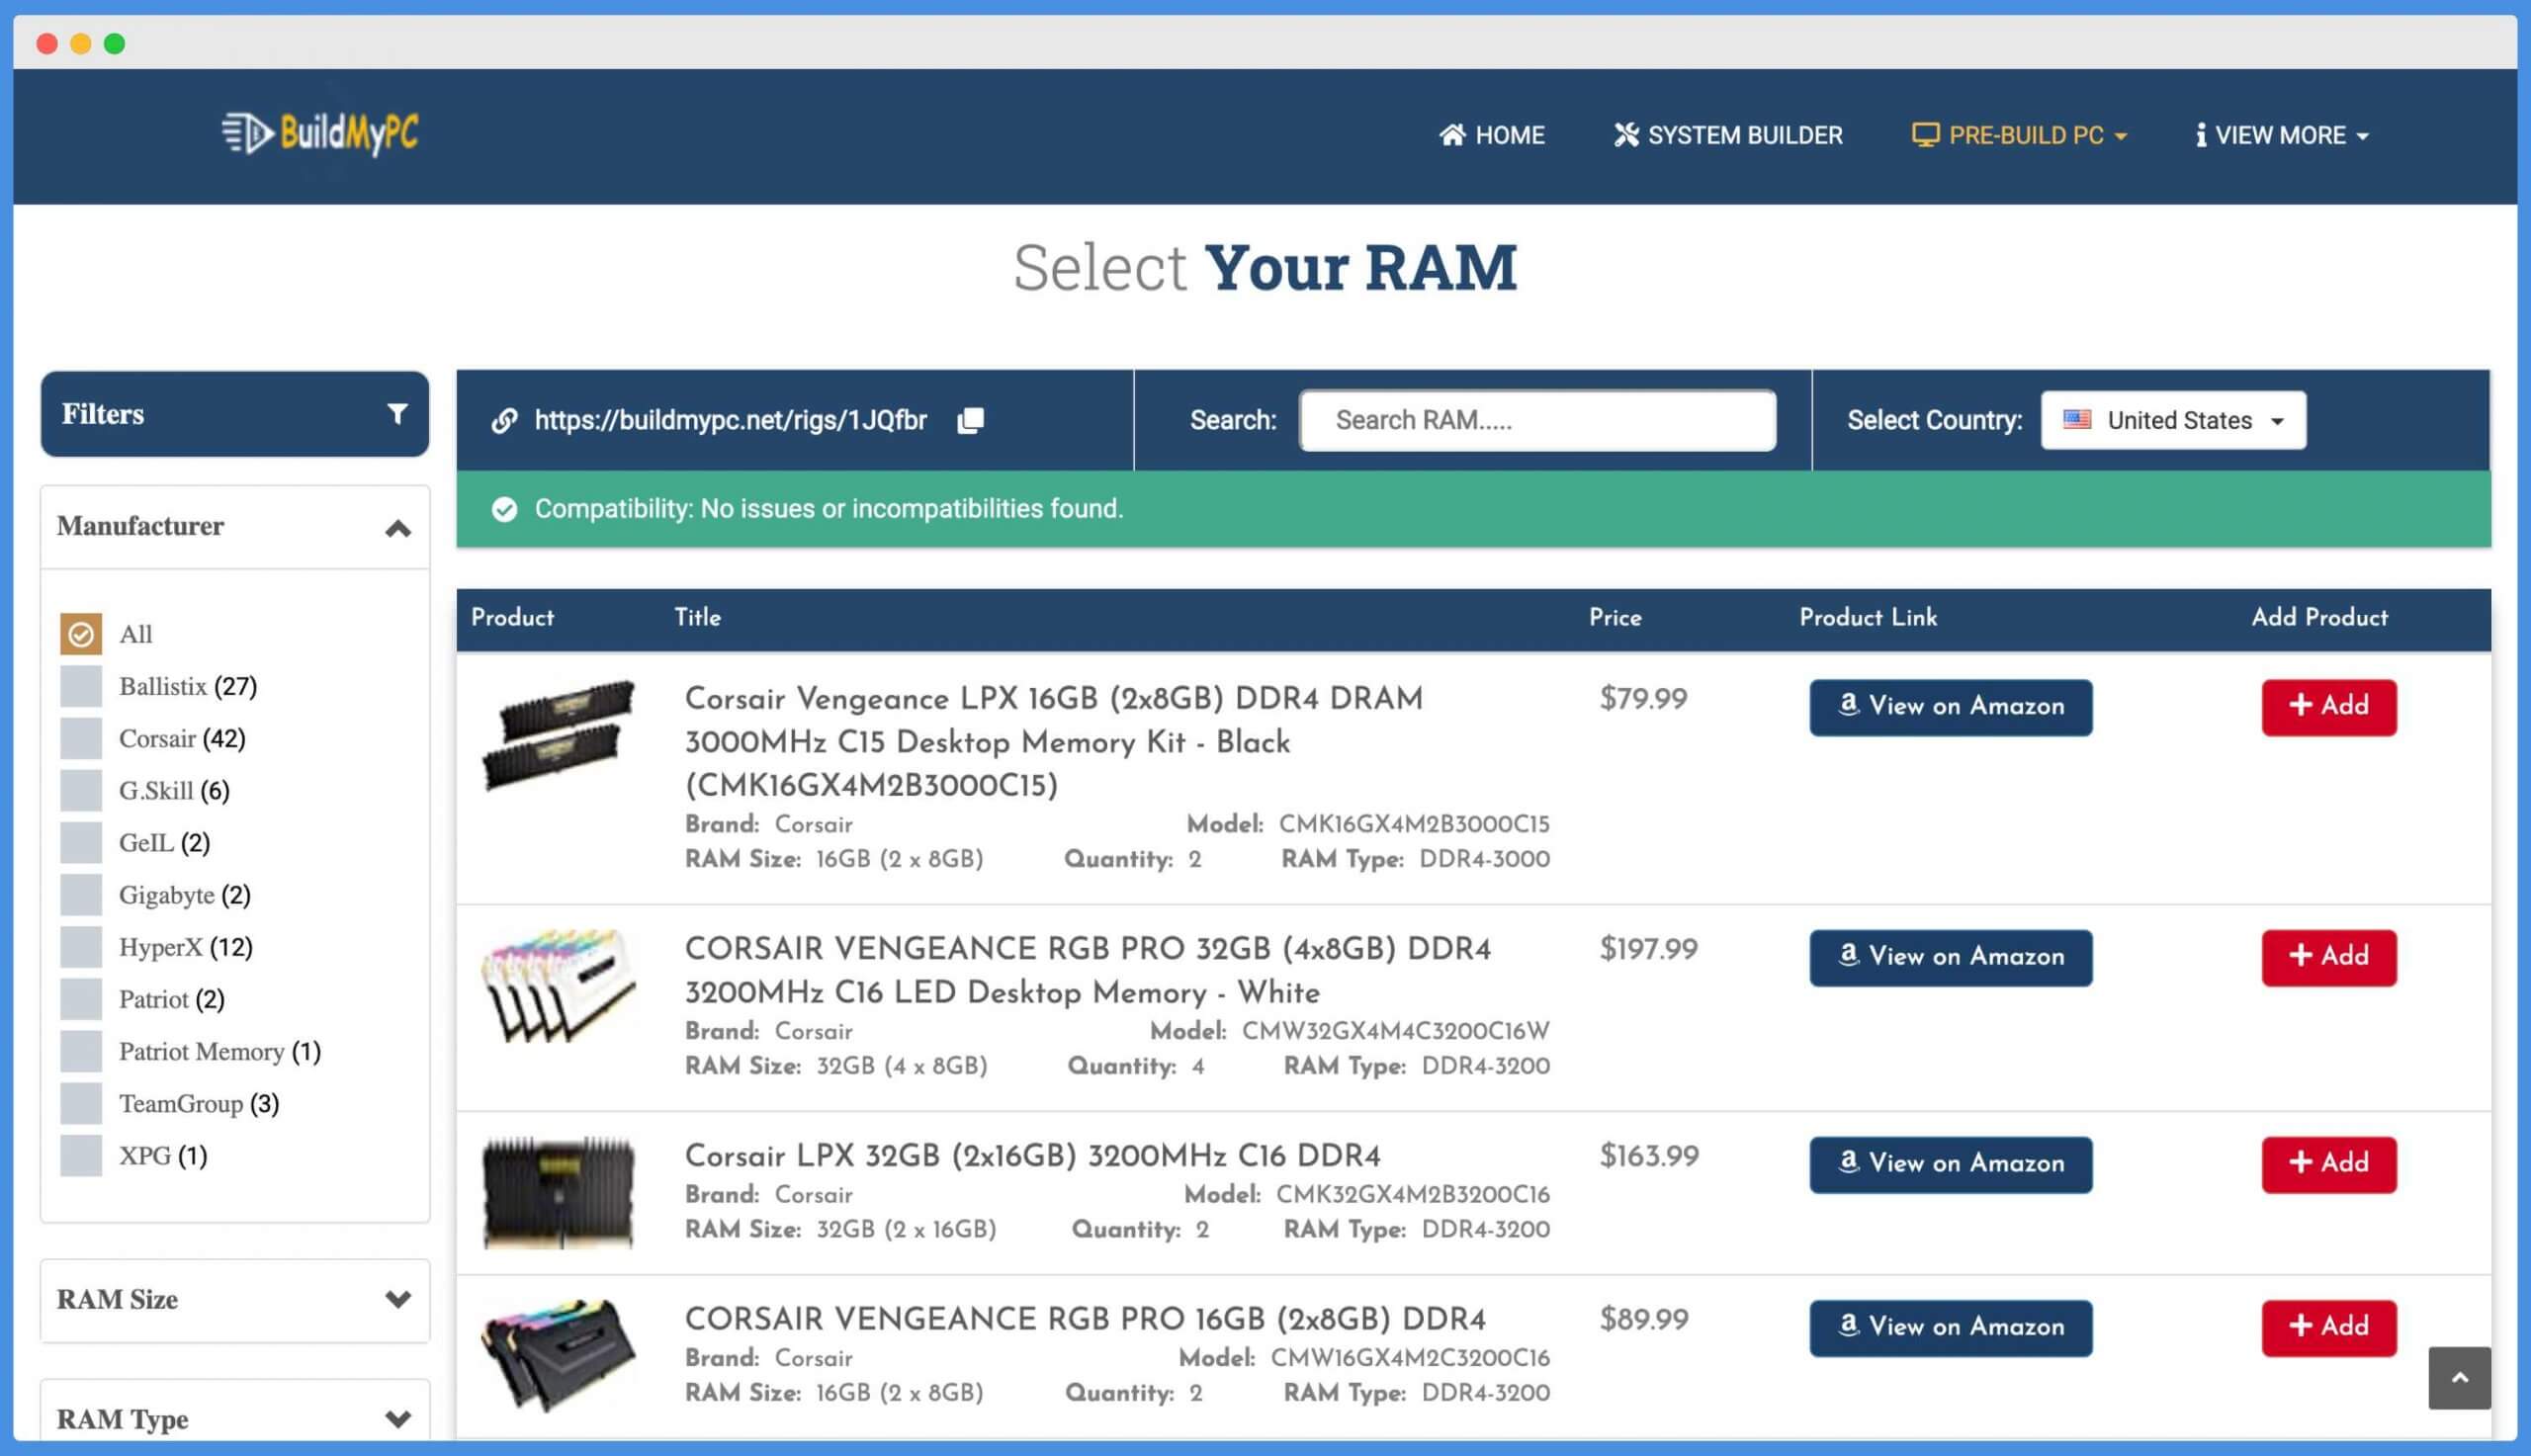
Here you’ll get various RAM options at different speeds, and maybe some of them even have ECC features. It will only show the RAM options which are compatible with your Motherboard, So you don’t need to worry about its compatibility.
Select the RAM according to your budget and requirements – And as I’m building a gaming PC, I need a minimum 16 GB of RAM to easily handle the game with no hanging issue.
So I’m adding “Corsair Vengeance RGB Pro” RAM into my list. It comes with RAMs of 8GB size, and it has 3200 MHz speed (we measure RAM speed in MHz). It is perfect for gaming and how can I forget… it has RGB too.
Storage
Storage is another most crucial component in building a PC. Without storage, we can’t install or do anything on our system. So we need storage for our gaming PC build.
You’ll get various options like SATA based HDD storage that comes with 5400 and 7200 RPM with 2.5″ and 3.5″ inch variation. HDD is slow, and I only suggest using HDD for backup purposes or nominal use.
Apart from HDD, you can also get an option to install SSD on your PC build. SSD is faster and provides much faster read and write speed as compared to a traditional HDD option.
You’ll get two types of SSD storage on our website BuildMyPC, and these are as follows;
- SATA SSD: Replacement of HDD (Hard Disk Drive) – using RAM modules instead of circulars magnetic disks
- M.2 SSD: This type of SSD are ten times faster than the normal SATA SSD because it uses a more direct pathway to your CPU and bypasses the South Bridge. M.2 sticks are about 1.5 times the cost of a normal SSD.
Now click on the “Add Component” button next to the Storage option to select compatible storage for your device.
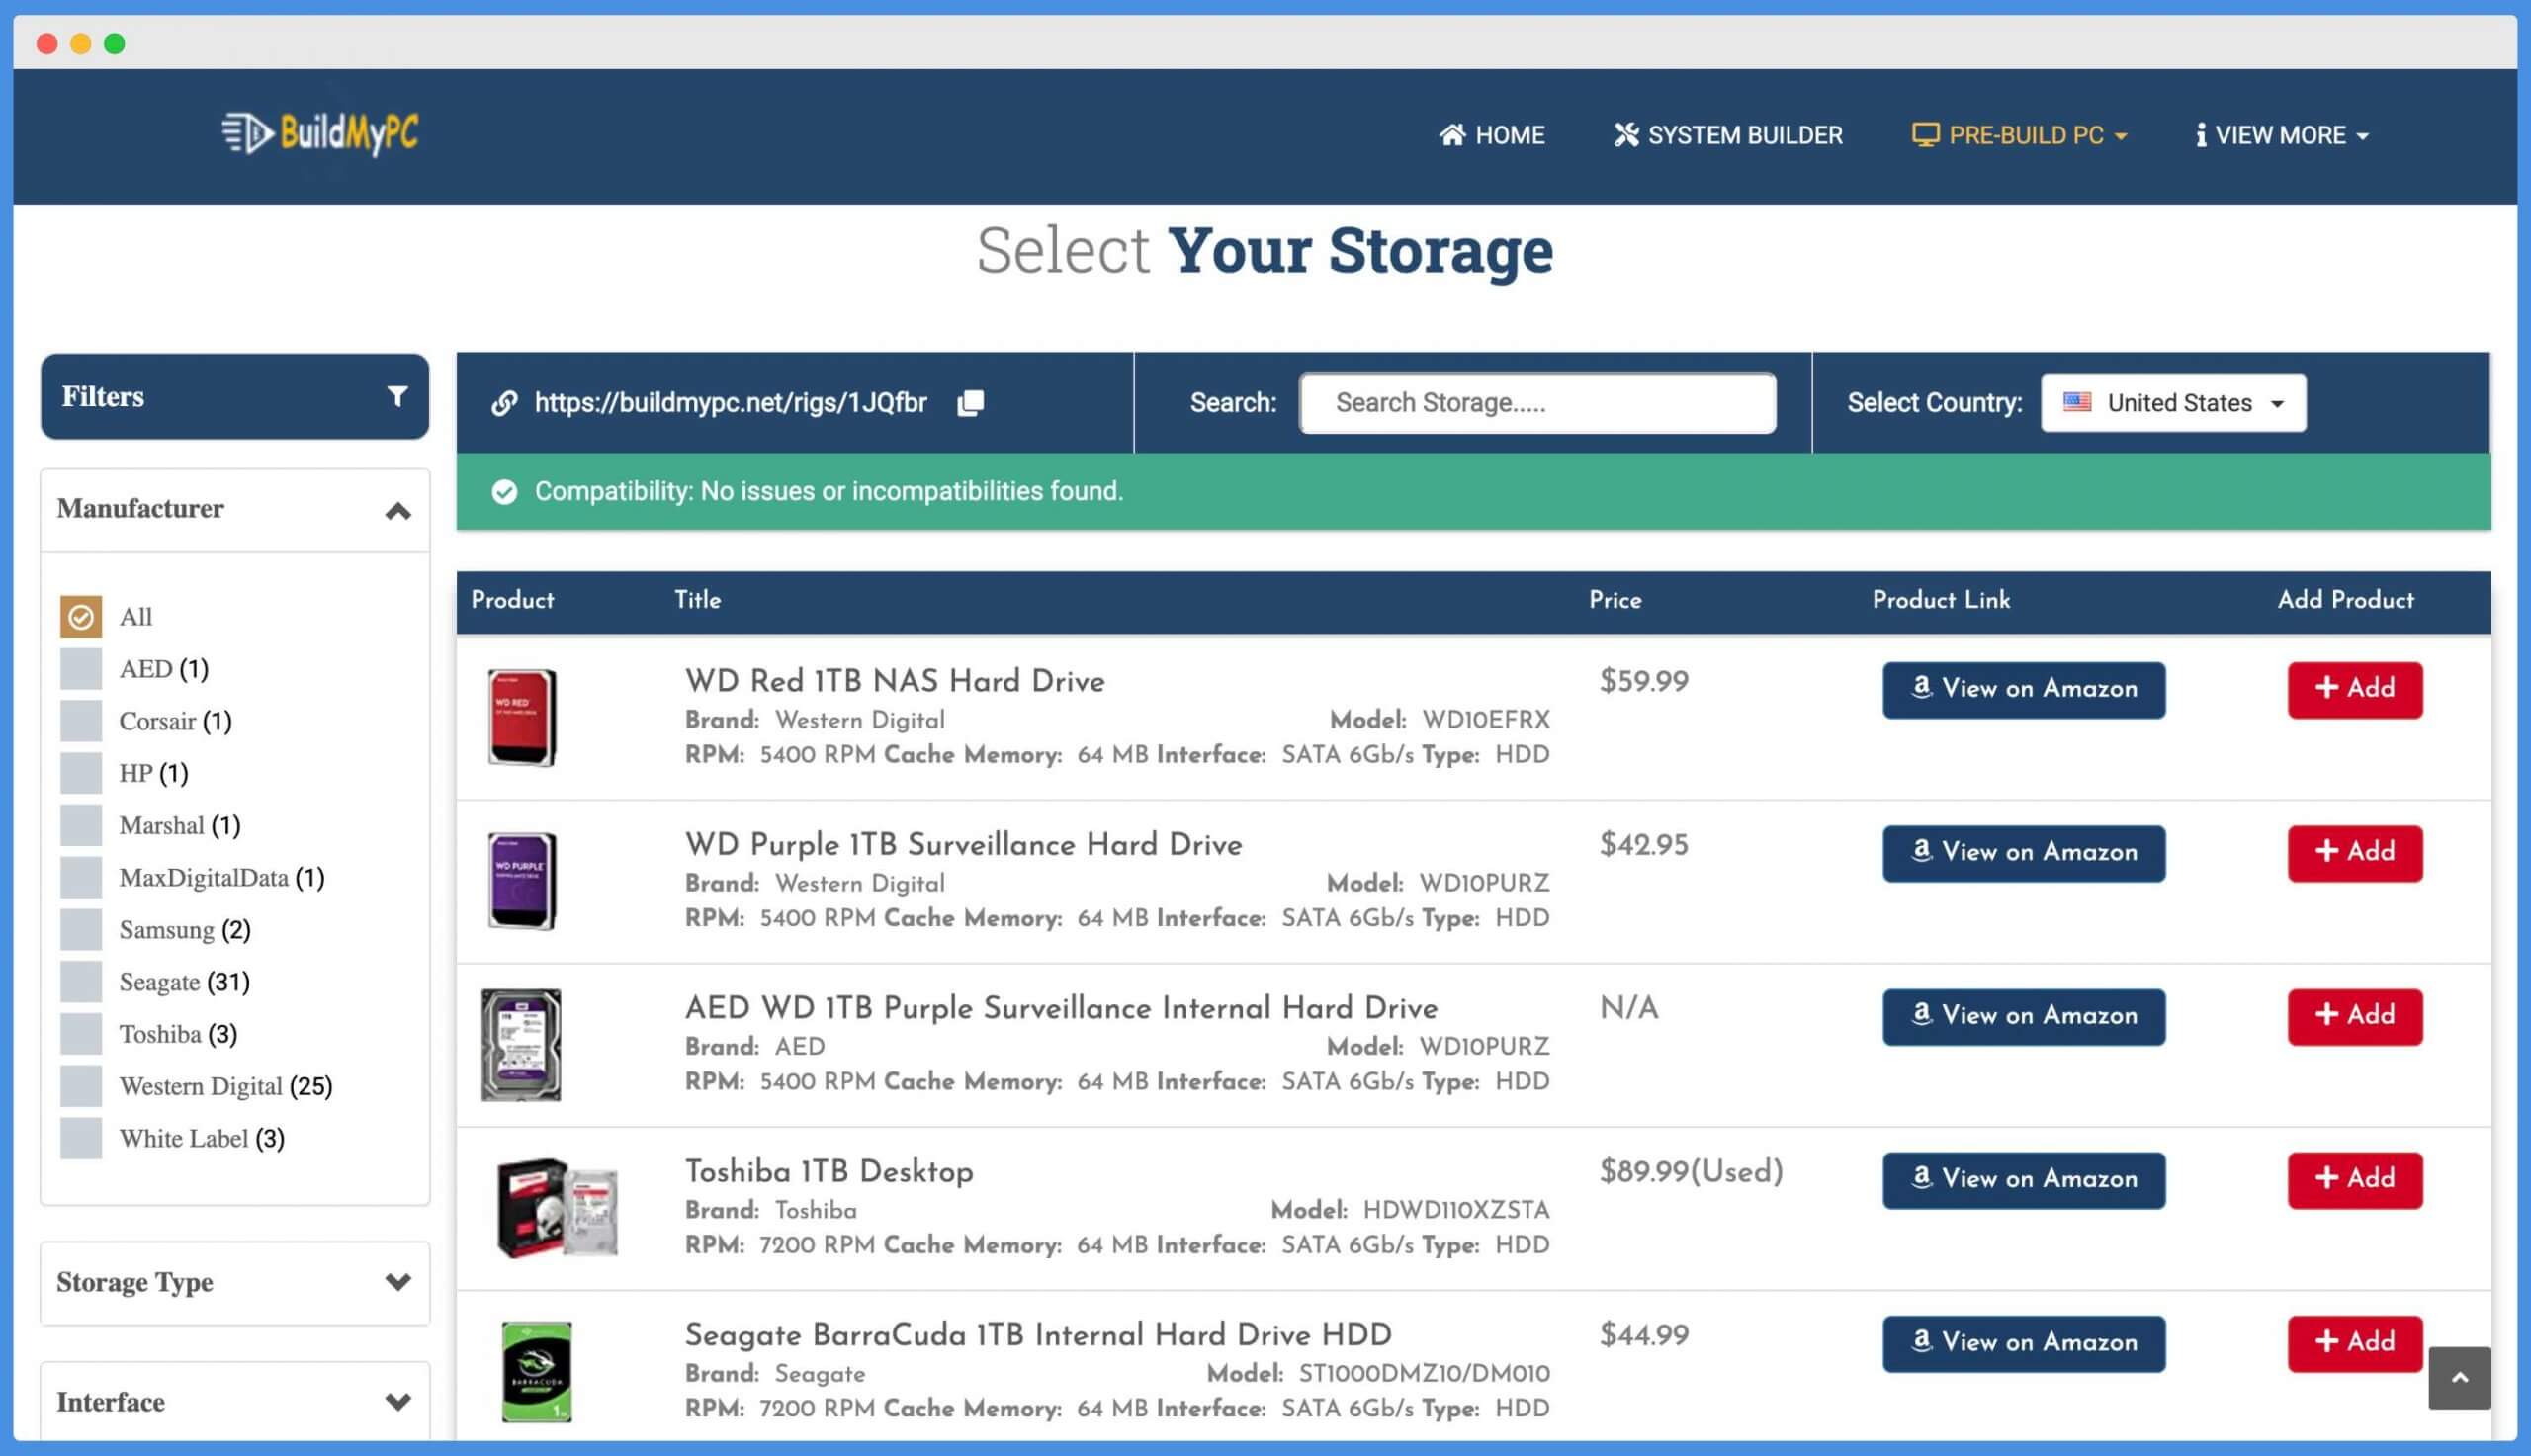
And first, we choose a “Seagate BarraCuda” HDD storage from the list. It is one of the most popular HDD drives with 7200 RPM and it comes with various options.
I’m choosing the BarraCuda 1 TB Internal storage for hosting a few files, songs, movies, etc., and I’ll choose another SSD based storage drive for installing OS and gaming.
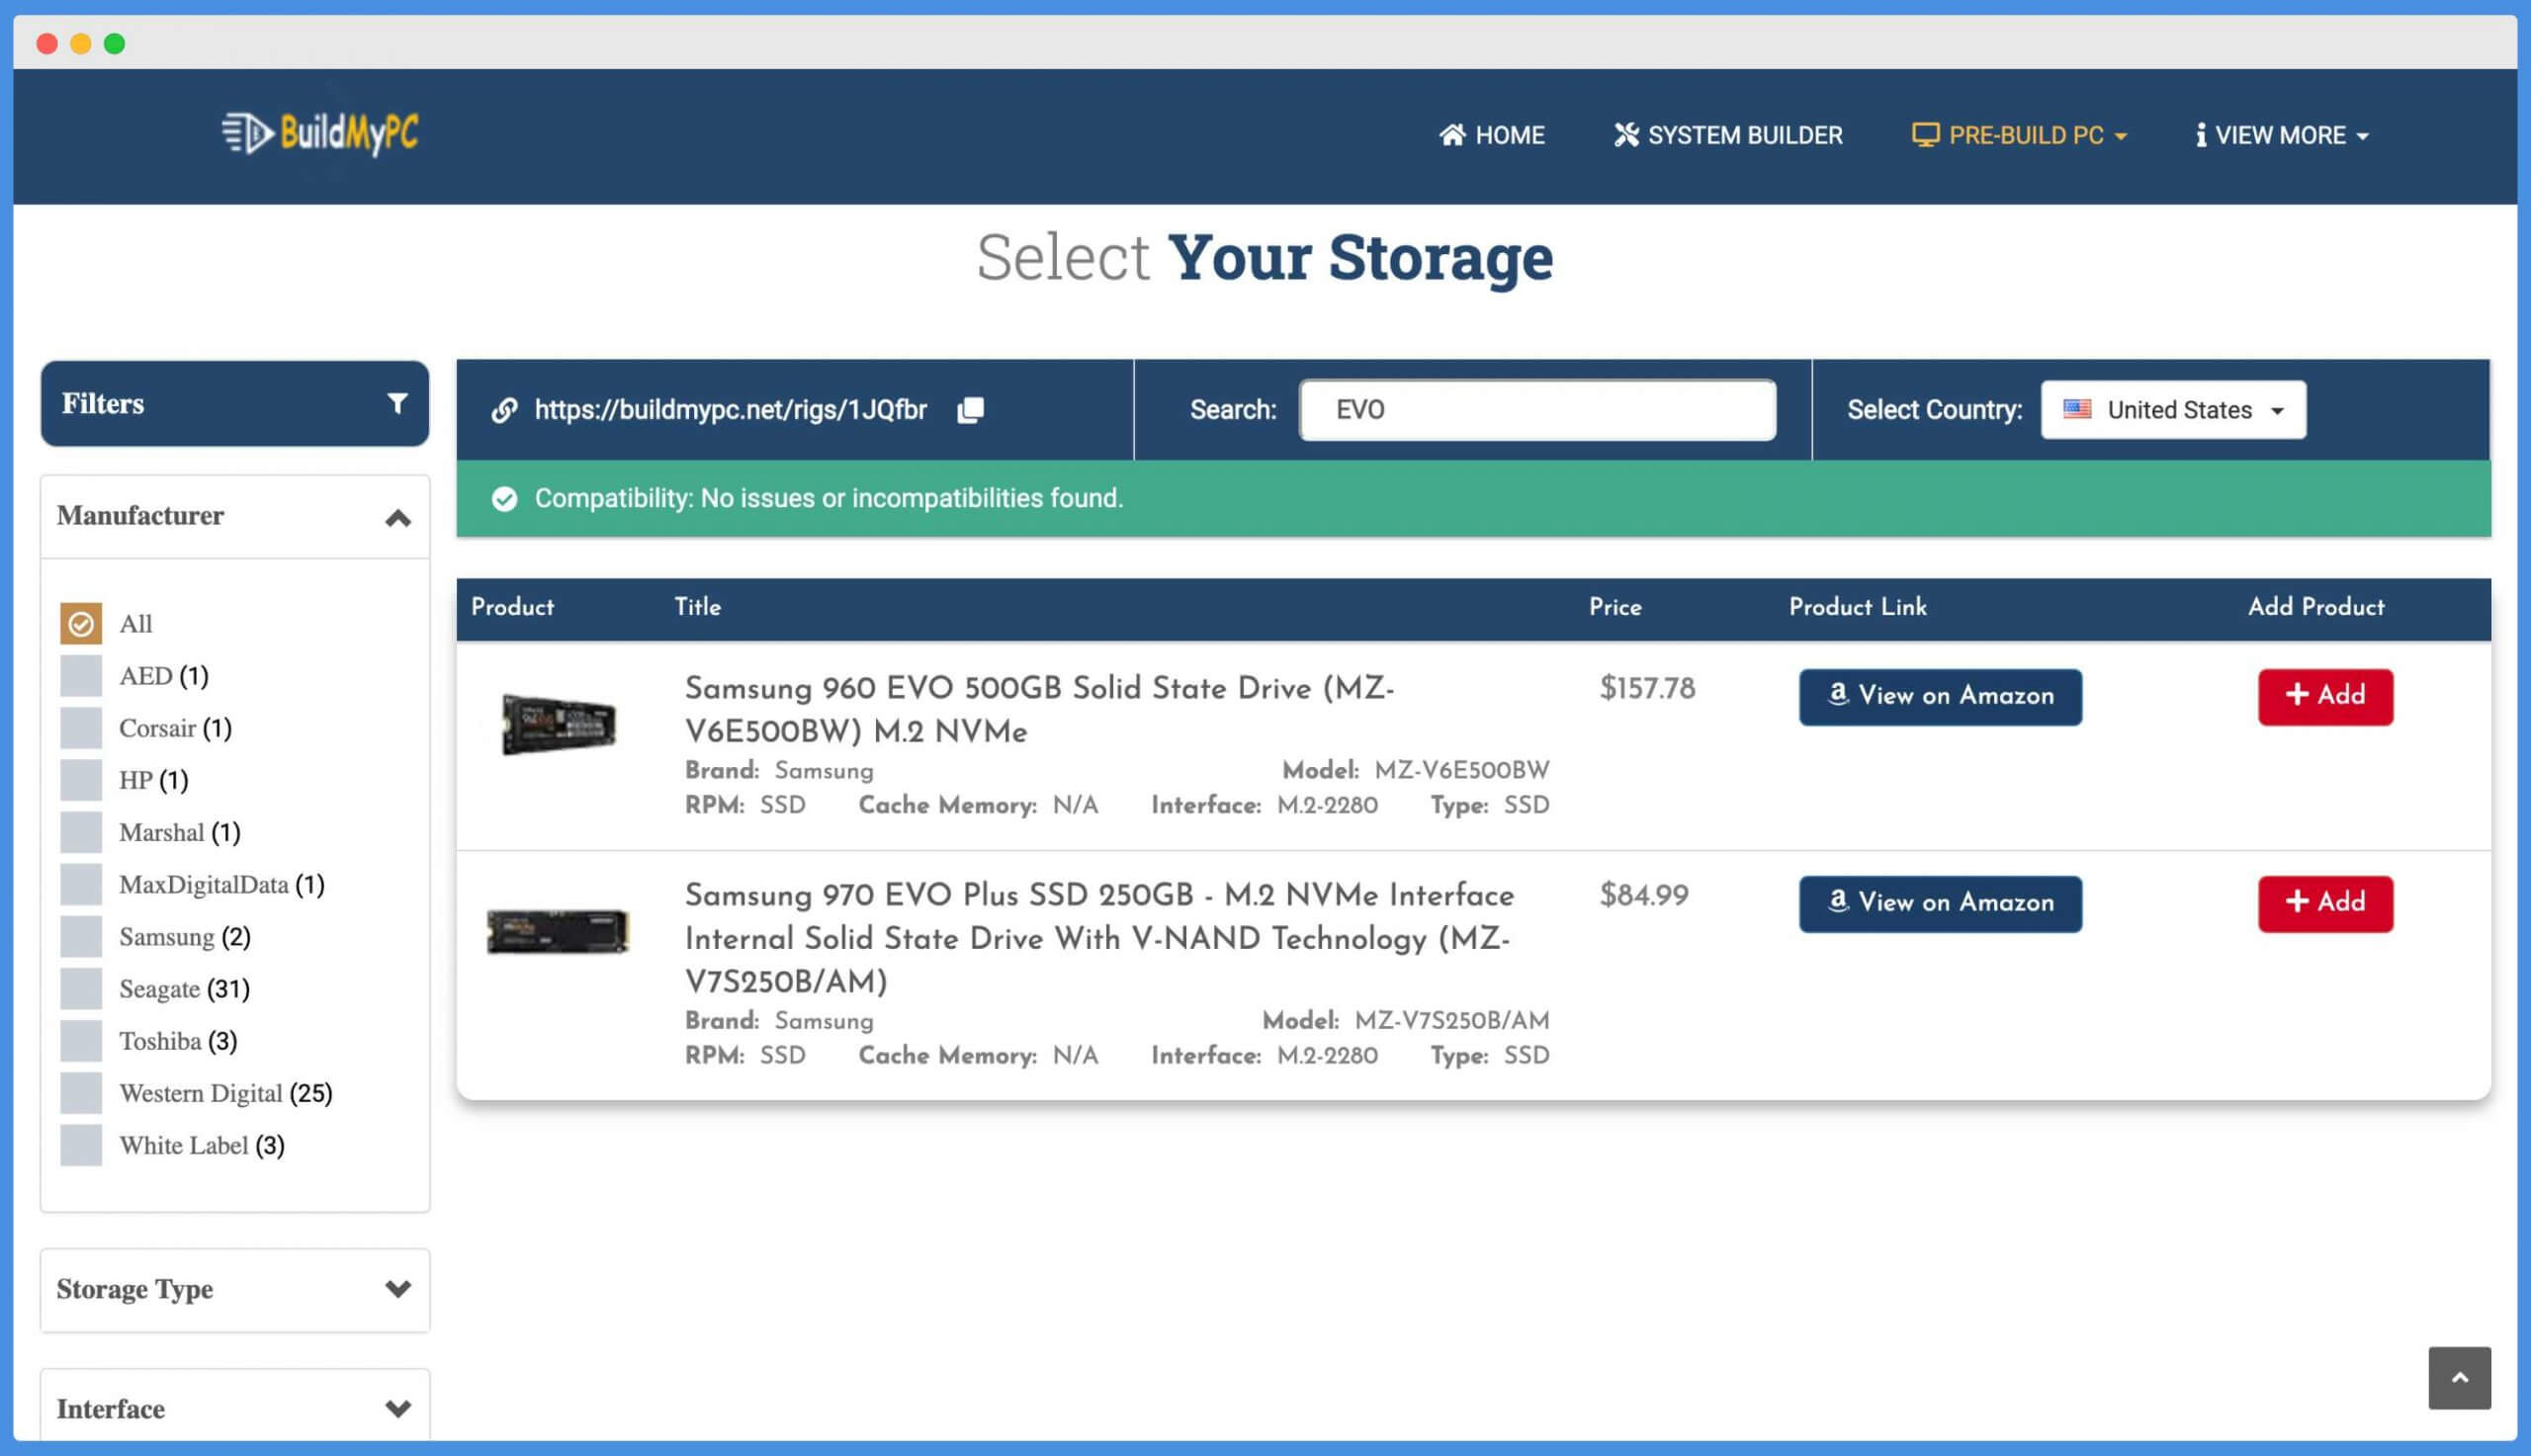
So for this, I again click on the “Add Another Component” and then search for the “EVO” in the search box.
EVO is a popular SSD brand by Samsung, and here we’re choosing M.2 based “Samsung 970 EVO Plus” for my device, which has 250GB of SSD storage. 250GB is enough for installing OS and other essential software to our system.
Graphics Card
We’re planning to build a gaming PC, then how can we forget to add graphics card on our list?
It is one of the essential parts of gaming. Adding a graphics card is as similar as we have added other components in our virtual environment.
To add a graphics card, click on the “Add Component” button next to the graphics card option.
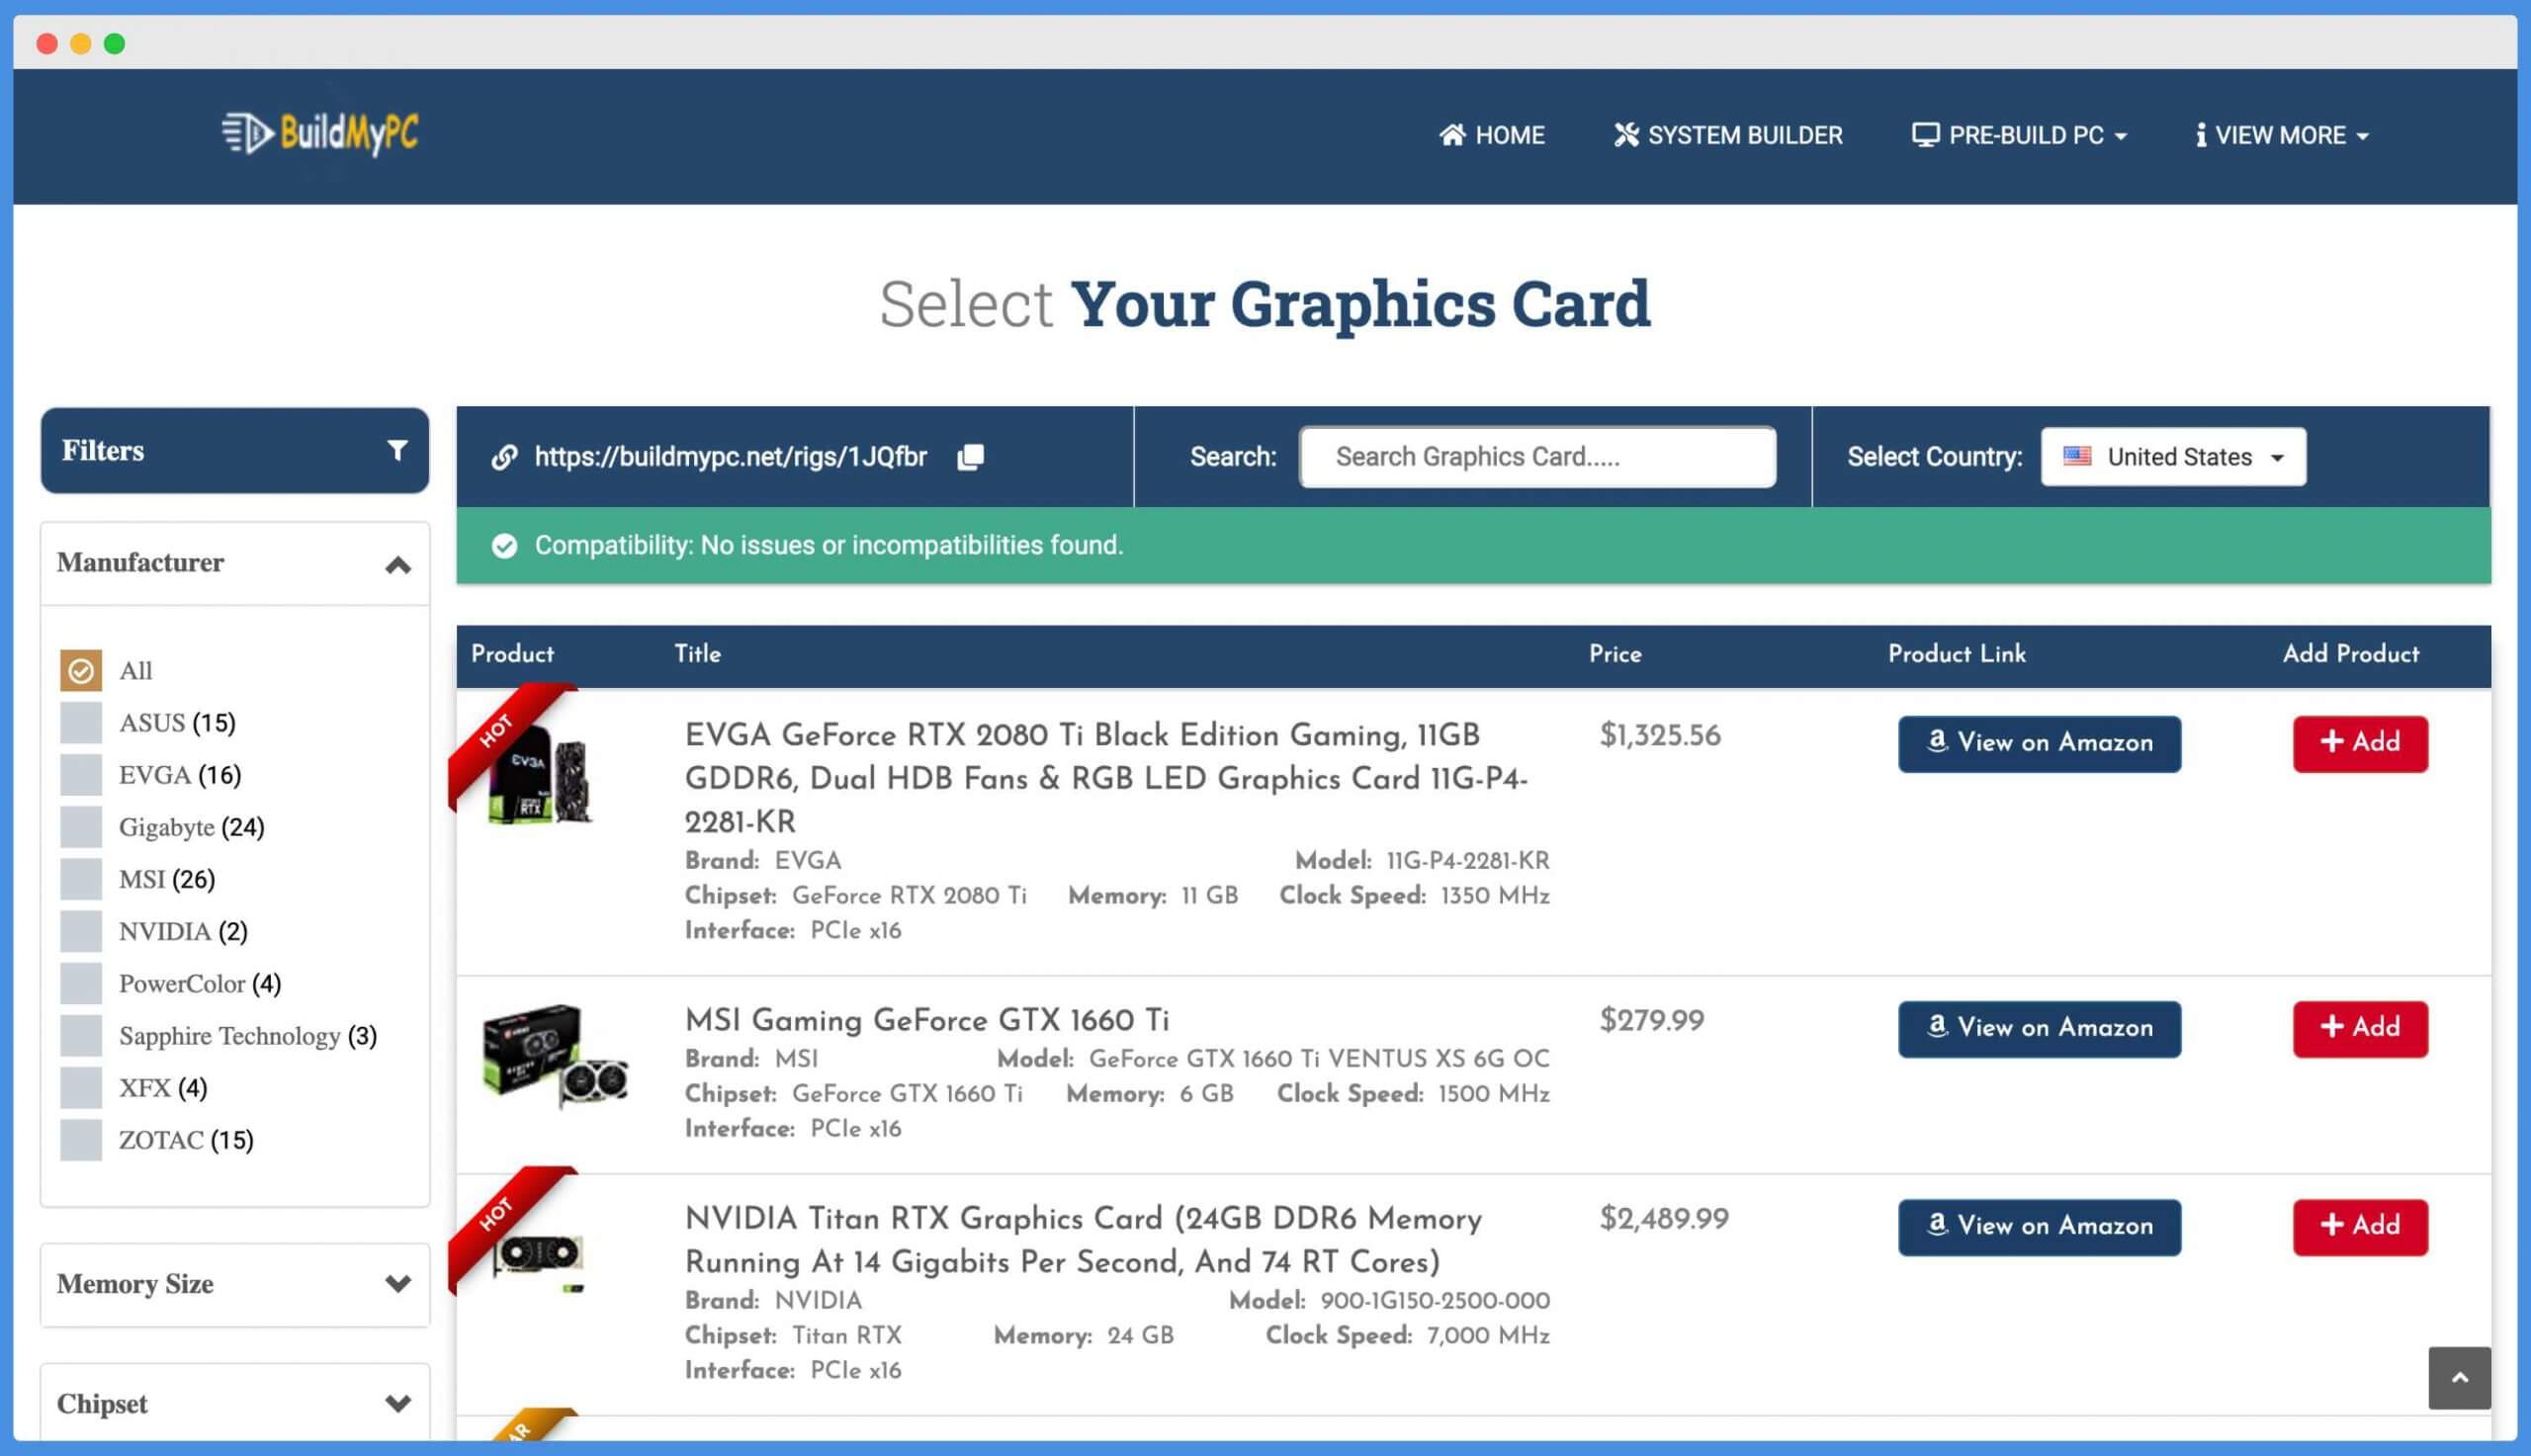
When you’re on the graphics card page, you can select any graphics card according to your budget and requirements. As I’m of a limited budget, I’m choosing the “MSI GeForce GTX 1660 Ti” graphics card for my PC build, which comes with 6GB of GDDR6 storage.
This graphics card can easily handle my gaming needs, and it is under my budget. So I’ll go along with this graphics card. You can also choose “Geforce RTX 2080” chipset based graphics card for boosting your gaming performance.
Power Supply
So the next step towards building our compatible list of parts is choosing a power supply unit. A power supply unit (or PSU) converts the main AC to low-voltage regulated DC power for the internal components of a computer.
It is an important component when you’re building a PC. As we’re building a PC for gaming purposes, we need a power supply unit 9PSU) of 700wattage. You can also choose the 650wattage PSU, but I’m choosing the 700 wattages because the graphics card needs a huge power supply.
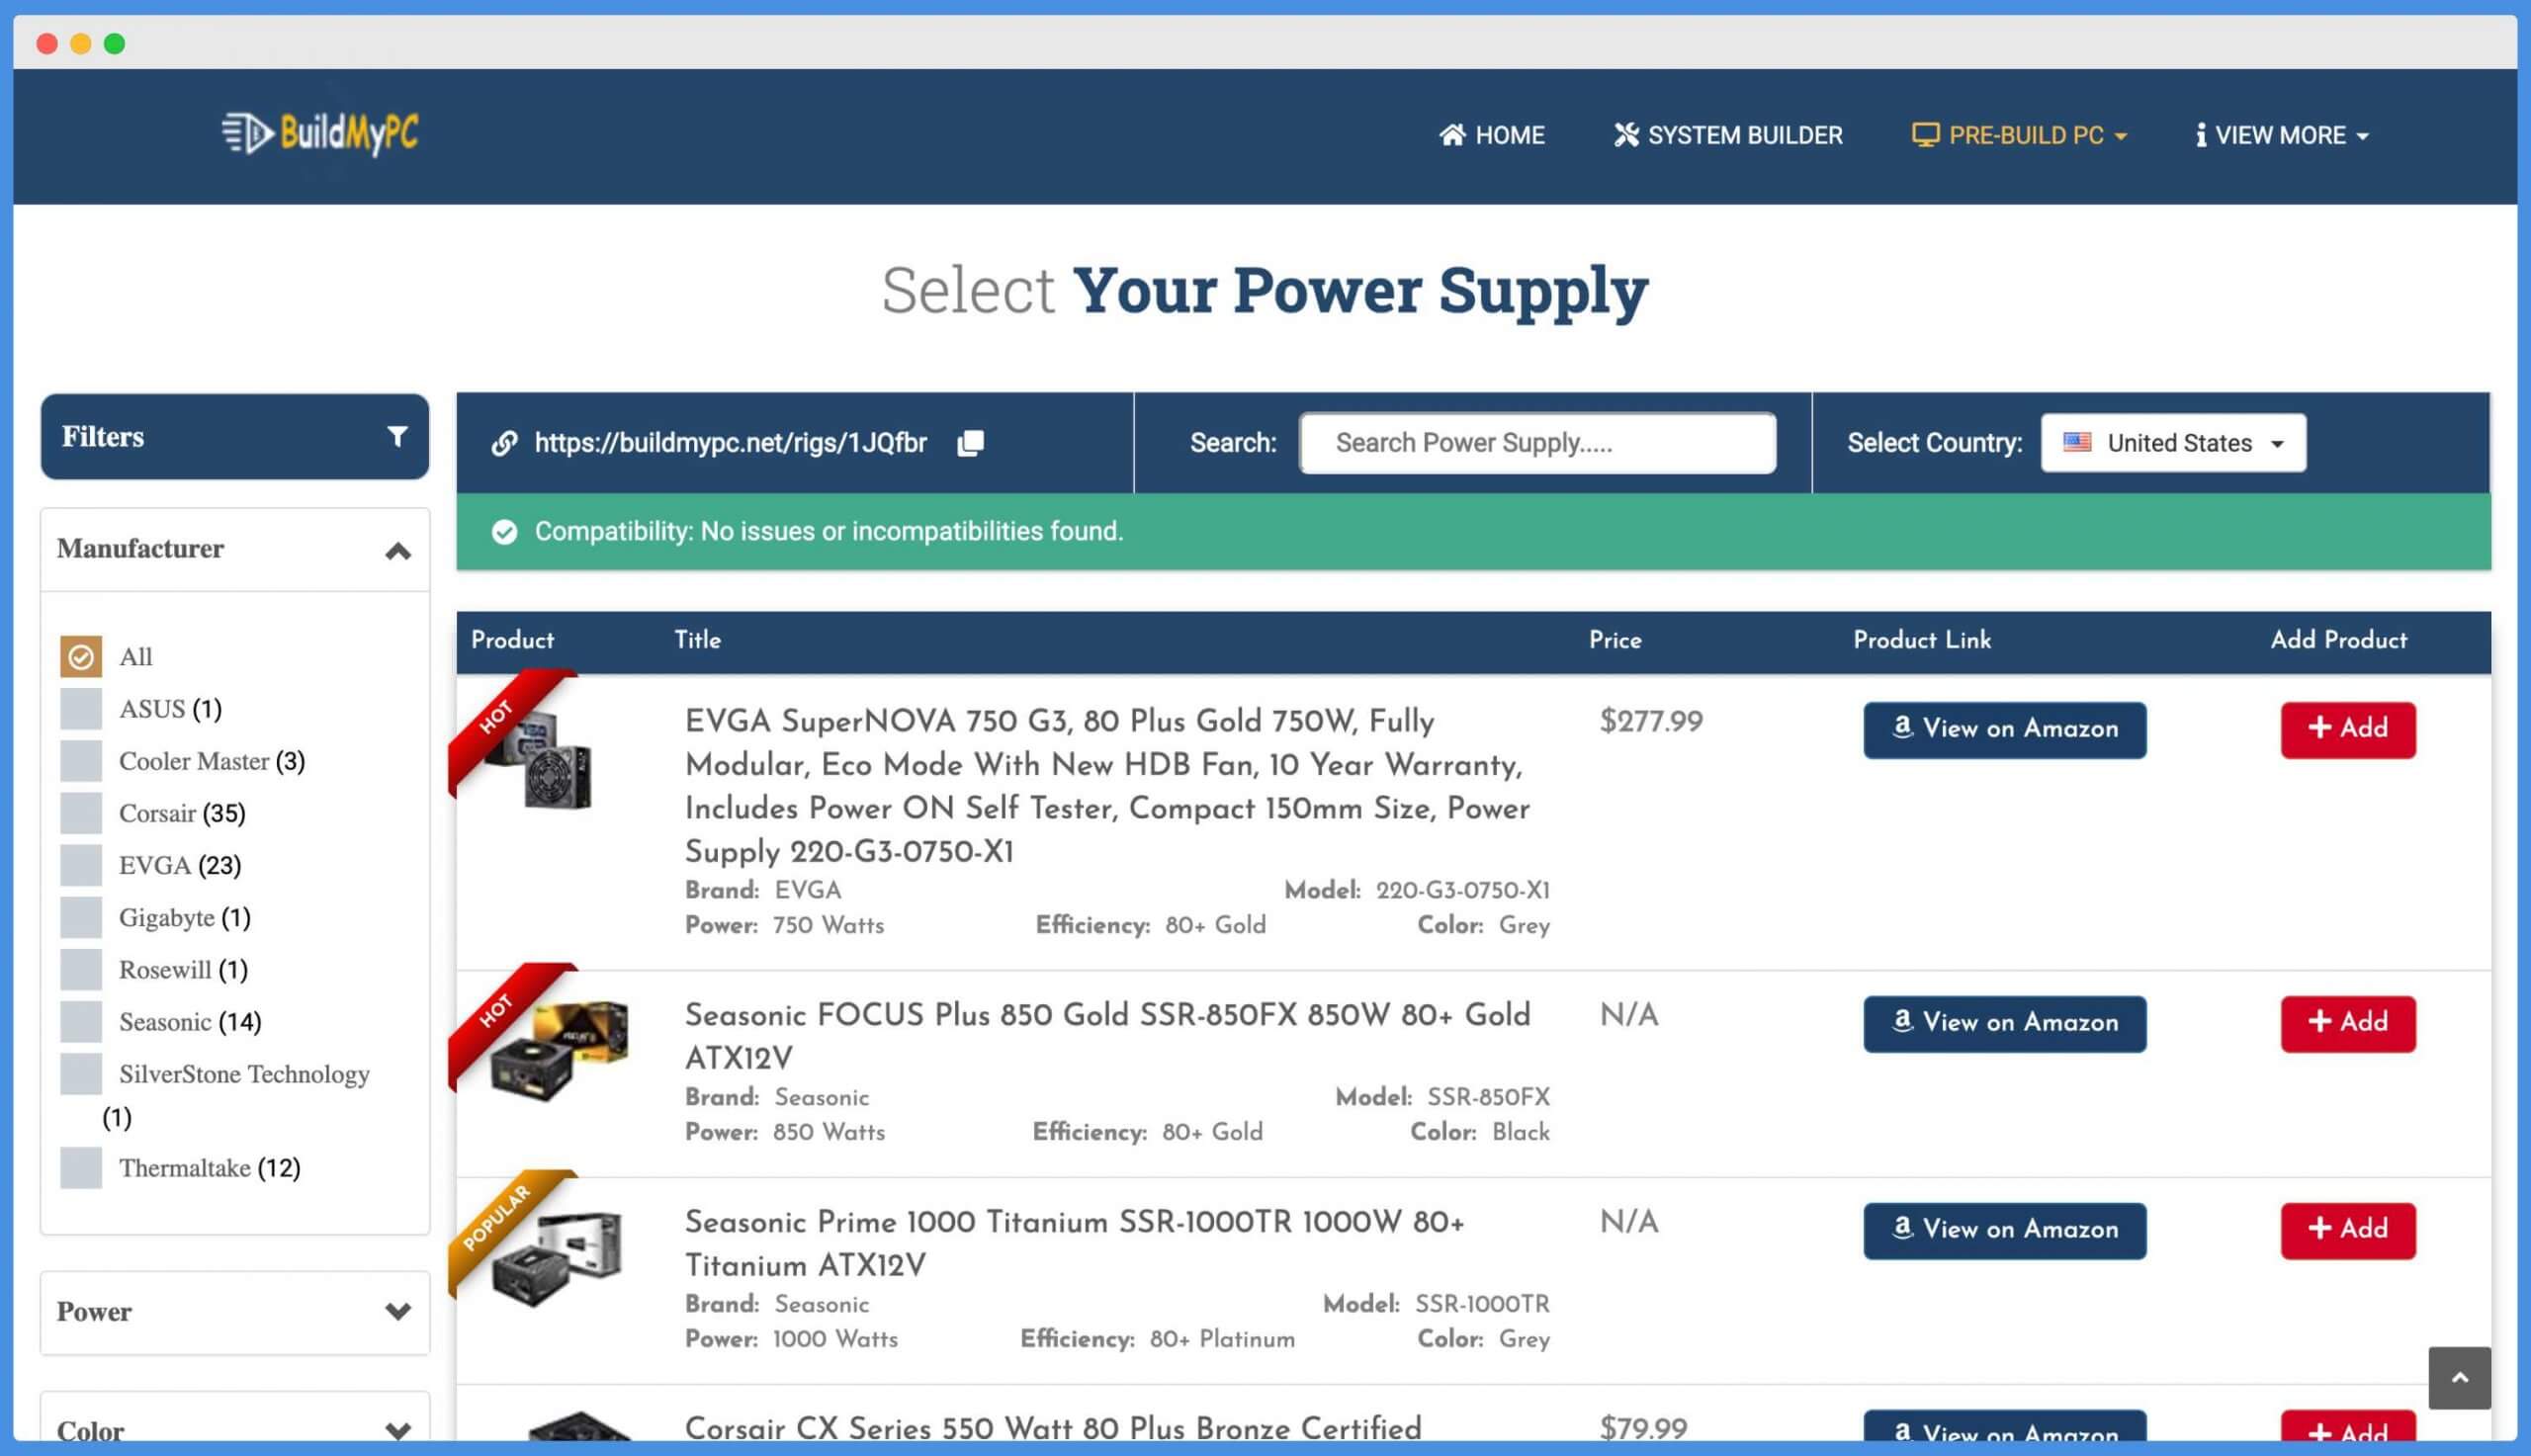
Now click on the “Add Component” button next to the power supply unit for adding PSU in our virtual environment.
Once we’re on the PSU page, you’ll get a variety of options for choosing a perfect power supply unit for your PC. We’re building a gaming PC, so we need to have a high wattage PSU unit – So I’m looking for something which has more than 700 wattages.
Here I’m adding the “EVGA SuperNOVA 750, 80+ Gold” option in my compatible part list. It has an efficiency of 80+ Gold with 750 wattages.
Network Adapter
The motherboard we have added in our list has an integrated network adapter, but sometimes, when we look for the compatible upgrade of our PC, we have to add a Network adapter into it.

Nowadays, every motherboard comes with an integrated network adapter – but if by any chance your motherboard doesn’t have a built-in network adapter, or if you’re upgrading your system and using an old motherboard, then you can buy and add a compatible network adapter.
The network adapter is of two types;
- Wired Network Adapter
- Wireless Network Adapter
Adding Product to Amazon Cart
Now we have done adding the compatible product in our list.

And as you can see, there is no compatibility issue found in our virtual environment. It means that the product we used for building our PC is 100% compatible with each other.
So the next step is to add these products in our Amazon Cart and wait for the delivery. You can easily add all these products in your cart by simply clicking on the “Add to Amazon Cart” button.
Once your products have arrived, you can quickly start building your first gaming PC and showoff with your friends.
Cheers 🥂
Wrapping Up!
In this guide, we have discussed the compatibility of computer parts and how you can easily find the compatible parts as per your needs and requirements.
Now you can easily use our System Builder tool by BuildMyPC to start testing the compatibility of different computer parts and start building your PC.
I hope you liked this article, and if you do, just let me know in the comment section below.

